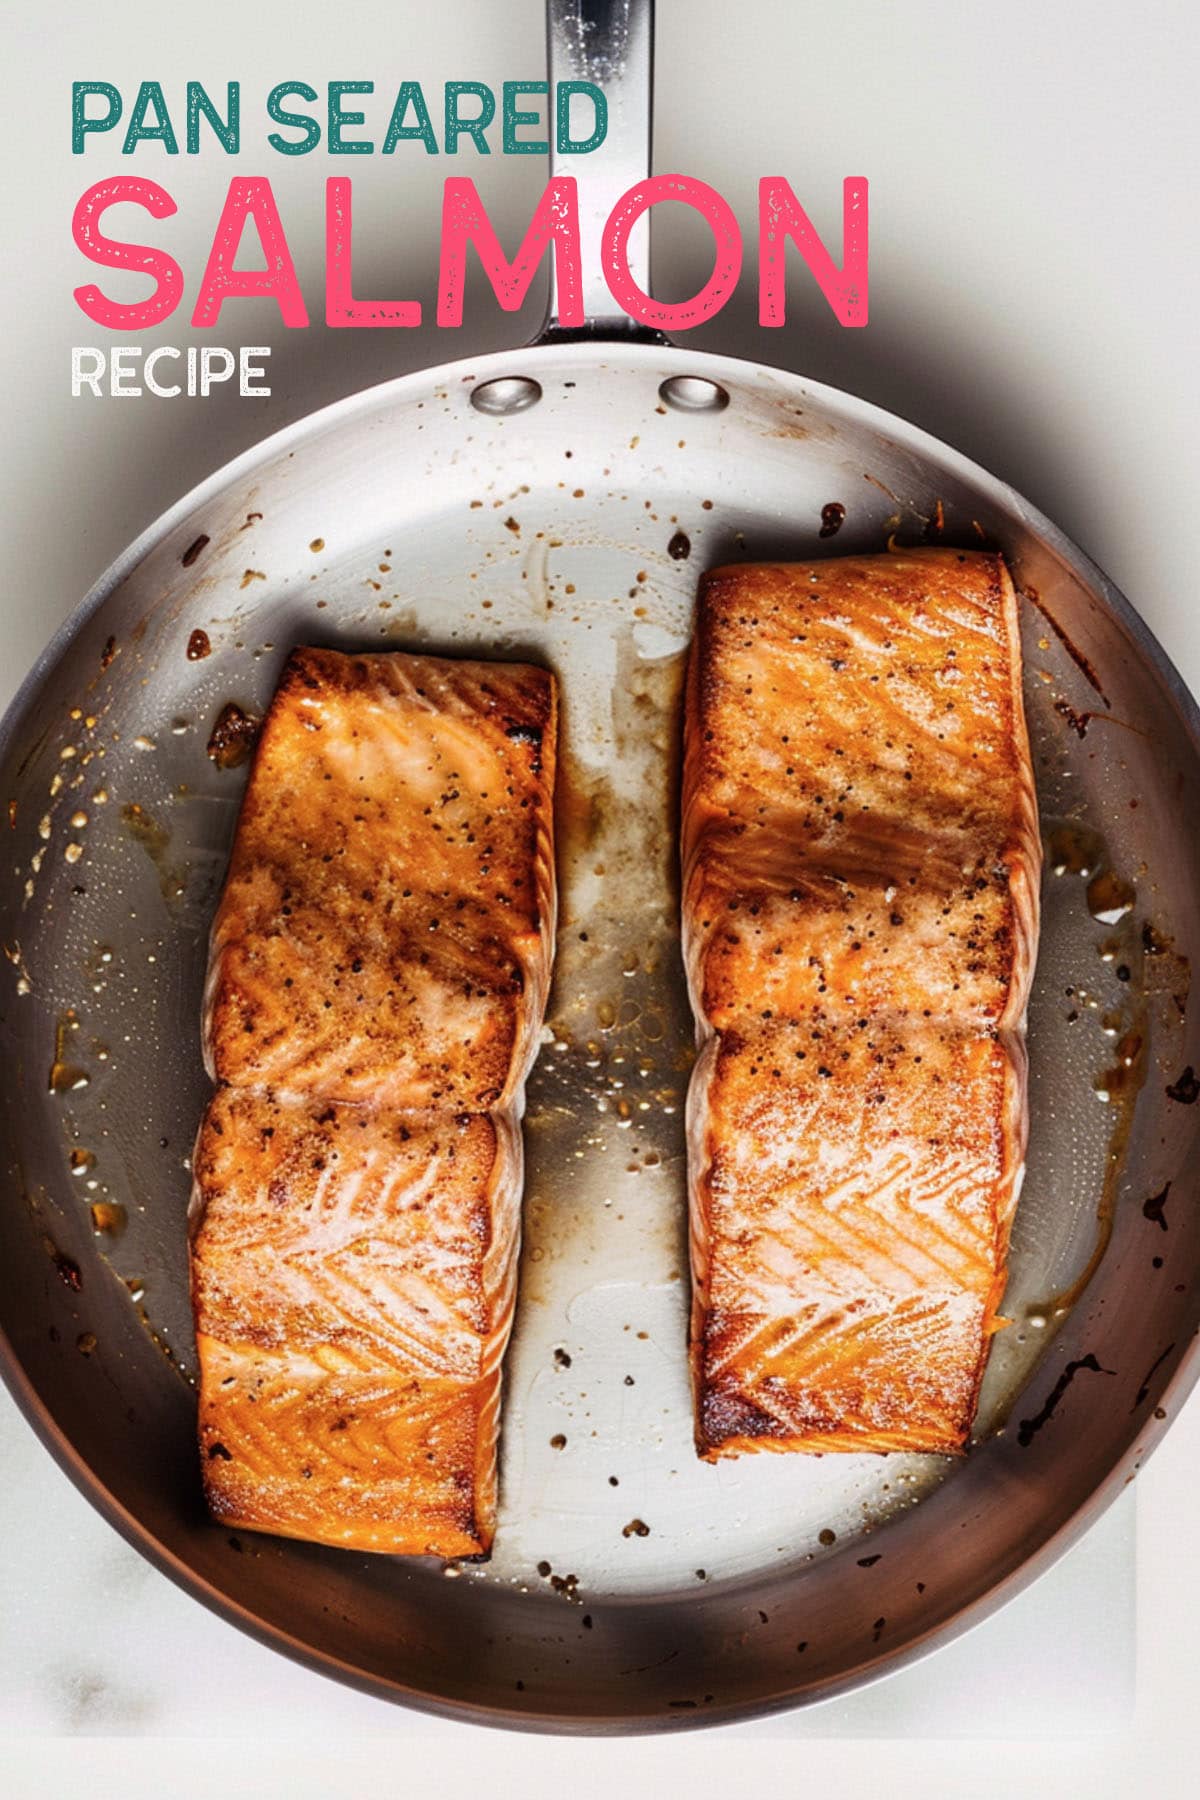
Simple? Check. Delicious? Absolutely. This Pan Seared Salmon is the perfect base for countless flavor combinations, making it an easy weeknight favorite, ready in under 20 minutes."

Understanding Pan Searing
Basics:
Pan-searing involves heating a pan (ideally stainless steel or cast iron for efficient heat retention) to a high temperature. A thin layer of high smoke point oil (like avocado or grapeseed) is added. The salmon is placed in the hot pan, creating immediate sizzling.
The Maillard reaction is the key to the magic: intense heat transforms the salmon's natural sugars and amino acids. This results in hundreds of new flavor compounds, a deeply caramelized crust, and a savory, nutty aroma.
Benefits:
- Flavor Explosion: Pan-searing isn't just about color; it's about unlocking unparalleled flavor. The caramelization creates a depth and complexity that is impossible to achieve with gentler cooking methods like poaching or baking.
- Texture Contrast: A perfectly seared salmon delivers delightful textural interplay. The exterior is crisped, yielding a tender, succulent interior that practically melts in your mouth.
- Efficiency: Pan-searing is fast! With a properly heated pan, you can achieve a beautiful sear and perfectly cooked salmon in minutes. It's a fantastic option for busy weeknights or when you want a gourmet meal without hours of prep.
- Versatility: While amazing, seared salmon is a blank canvas for flavor. Pan sauces, fresh herbs, a squeeze of lemon - endless possibilities.
Preparation for Searing
Selecting the Salmon
- Freshness: Look for vibrant, firm flesh that springs back when lightly pressed. Avoid salmon with a dull appearance, soft spots, or a strong fishy odor. Check for clear eyes (if buying a whole fish) and intact, moist gills.
- Cut Types:
- Skin-on: Ideal for pan-searing as the skin helps protect the delicate flesh and provides the perfect surface for achieving a crispy crust.
- Skinless: Still suitable for pan-searing but requires extra care to prevent overcooking and achieve an appealing browning.
- Portions: Individual fillets are most common. Center-cut portions are thicker and provide a more substantial bite. Consider thickness when determining cooking time.
Tools Needed
- Pan: Heavy-bottomed pans like stainless steel or cast iron are essential. They retain heat evenly, which is crucial for a proper sear and for preventing temperature drops when the salmon is added. Avoid nonstick for the best crust formation.
- Oil: Choose an oil with a high smoke point, like avocado, grapeseed, or refined canola oil. These can withstand the high heat necessary for searing without breaking down and imparting burnt flavors.
- Spatula: A wide, thin fish spatula is ideal for flipping the salmon without tearing the delicate flesh.
- Other tools: Paper towels for drying the salmon (key for good sear), tongs for handling, salt and pepper for seasoning.
How to Make Pan Seared Salmon (Step by Step)
Prep the Salmon. For larger salmon fillets, consider cutting them in half before cooking. This ensures even heat distribution and prevents the edges from overcooking while the center catches up.
Room Temp is Best. Remove the salmon from the refrigerator and let it sit at room temperature for 15 minutes.
Prep for Crispy Skin. Pat the salmon fillets dry with paper towels, ensuring both the skin side and flesh side are free of excess moisture. This simple step is crucial for achieving a perfectly crispy skin when pan-searing and helps prevent hot oil from splattering.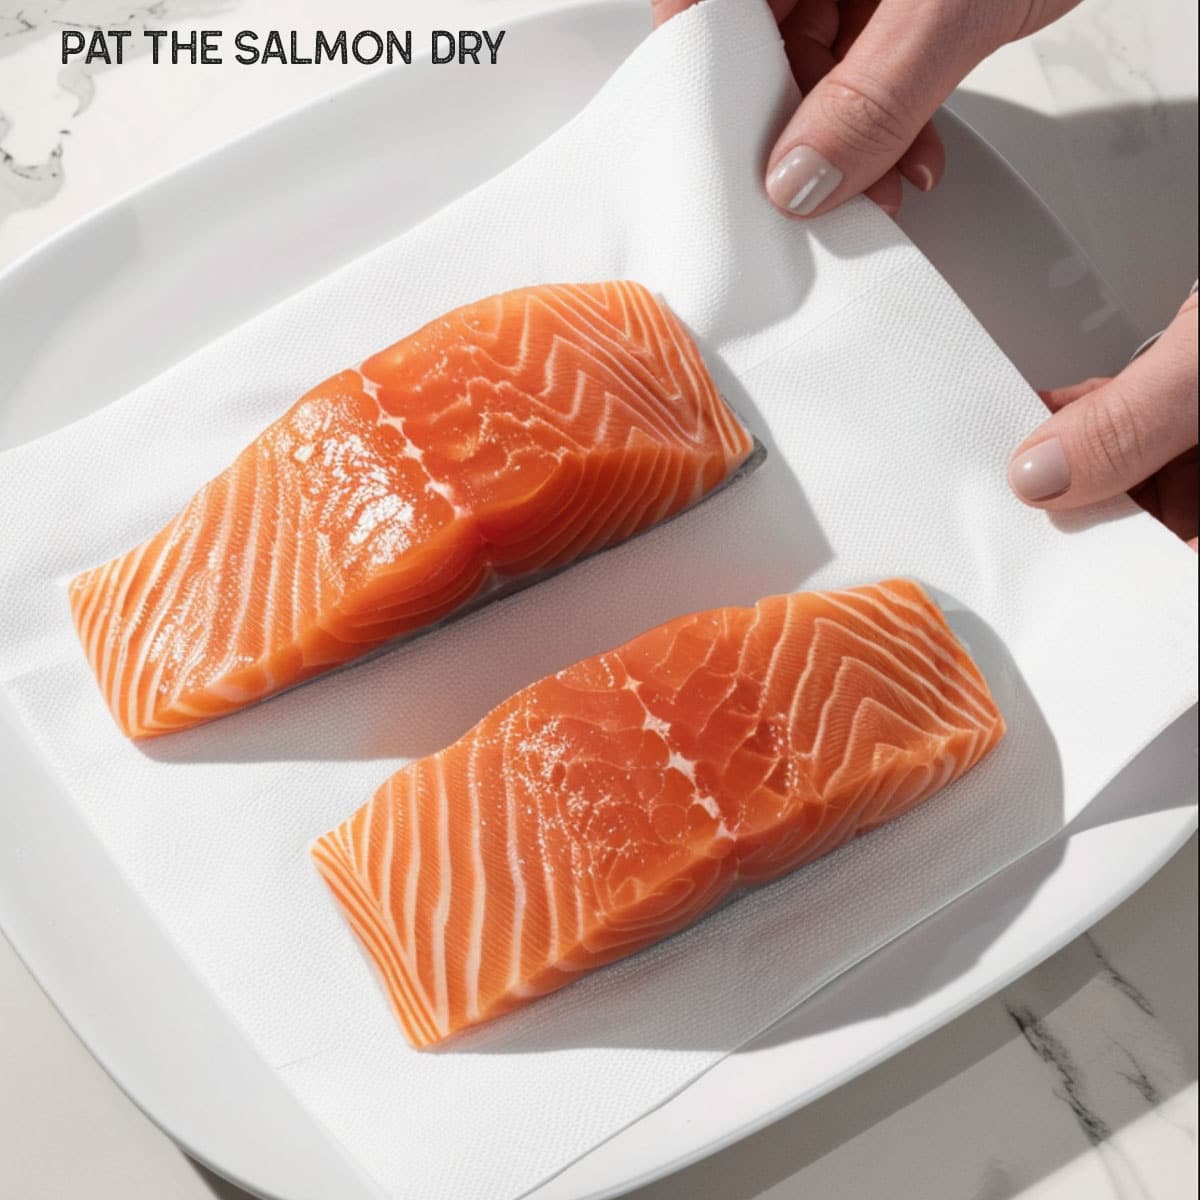
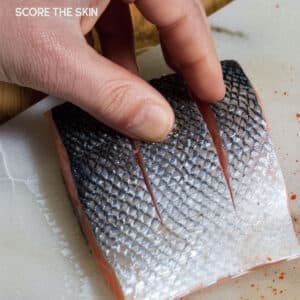
Prevents curling. Using a sharp knife, gently score the skin side of the salmon in a crosshatch pattern. Make shallow cuts about ¼ inch apart, being careful not to cut through the flesh.
Why This Helps:
Scoring the skin helps it cook more evenly, preventing the edges from overcooking while the center remains underdone.
The scores allow fat to render out from under the skin, resulting in a crispier texture.
As the salmon cooks, the skin naturally shrinks. Scoring helps minimize this, keeping your salmon fillets flat for a beautiful presentation.

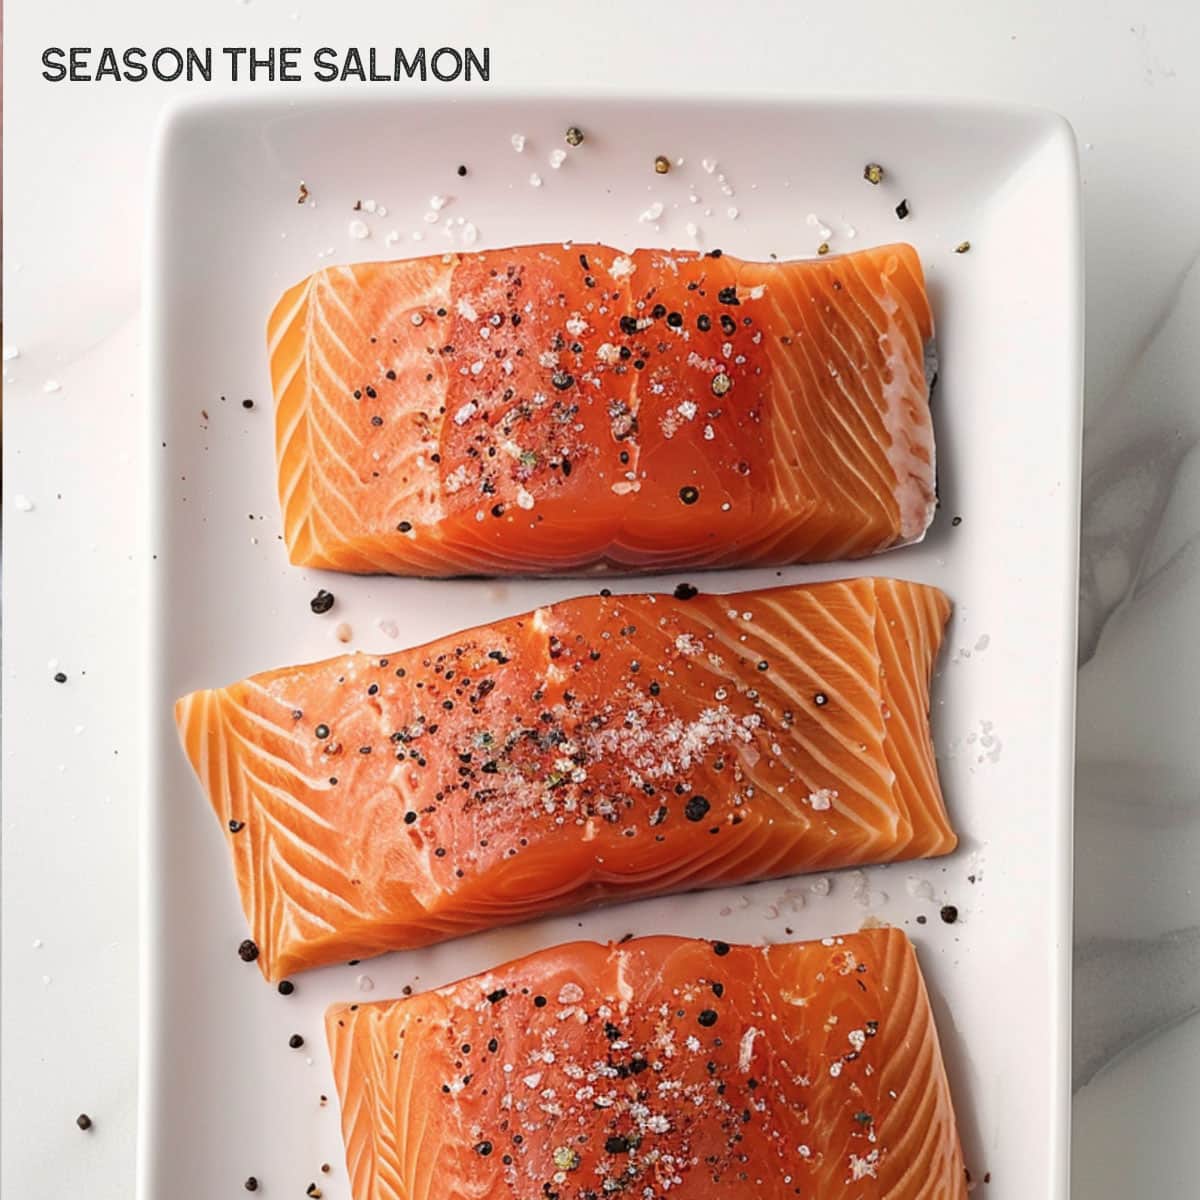
Flavor it Up. Season both sides of the salmon generously with salt and freshly ground black pepper. This creates a flavorful base and helps the salmon develop a beautiful sear.
Get creative with optional spices and herbs. Consider adding warmth with a pinch of cumin or paprika, a touch of brightness with lemon zest, or a custom spice blend inspired by your cuisine of choice.
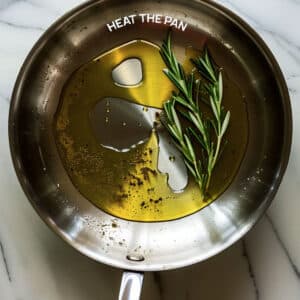
Heat the Pan. Place your skillet over medium-high heat. Add the olive oil. Heat until the oil shimmers and a wisp of smoke just begins to appear. Salmon is naturally fatty, so you need minimal oil in the pan. A light greasing is all it takes to prevent sticking.

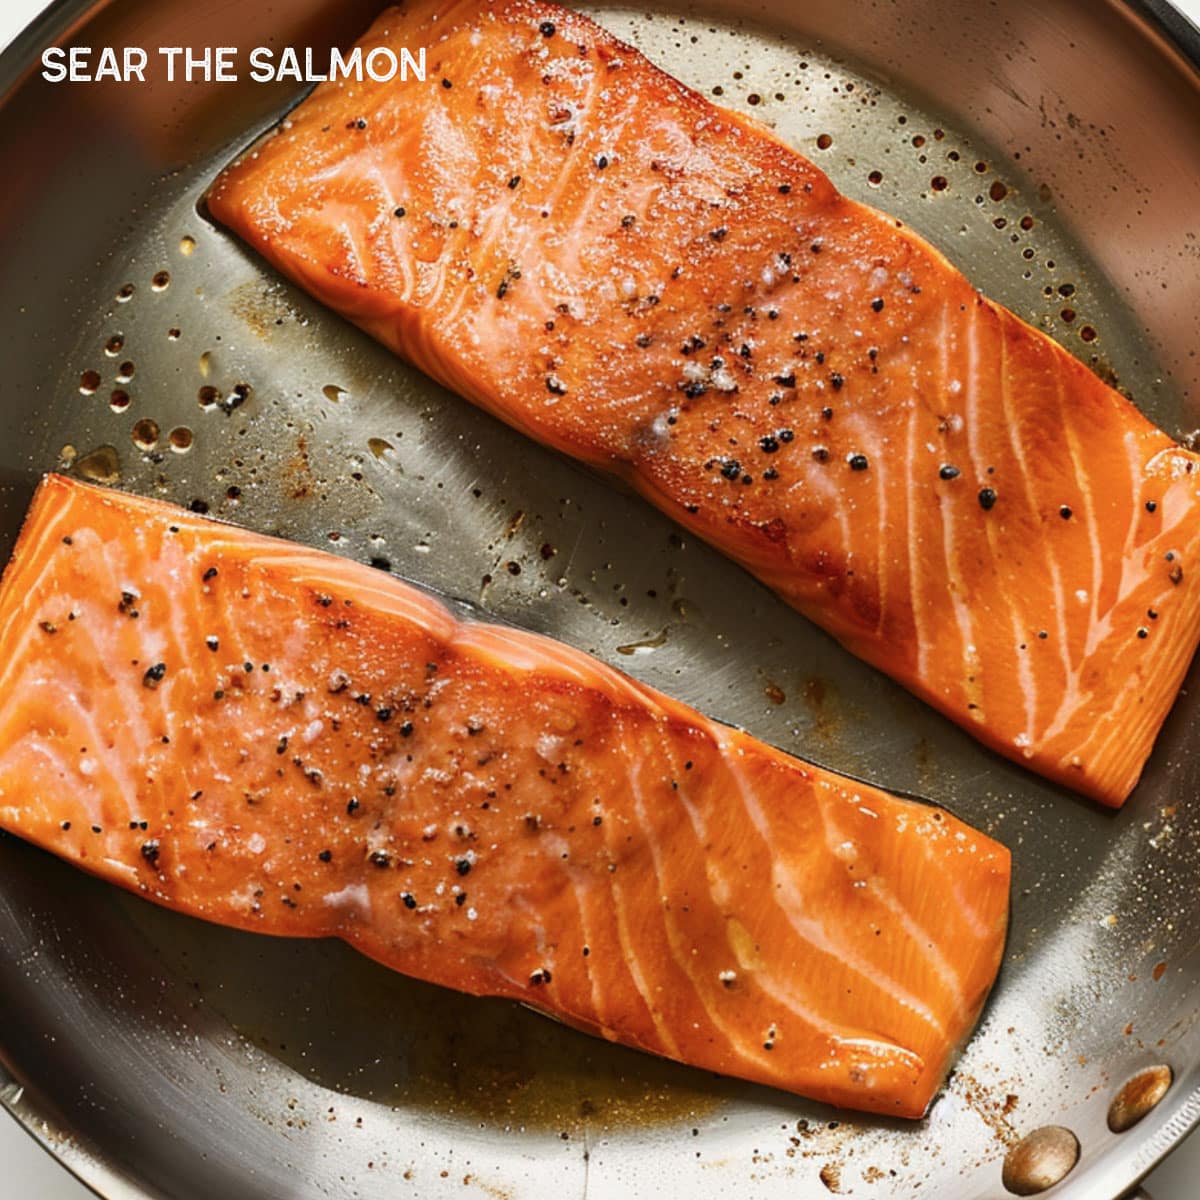
Sear the Salmon. Carefully place the salmon fillet, skin-side DOWN, in the hot pan. Don't overcrowd the pan (cook in batches if needed).
Let the salmon sear undisturbed for about 7 minutes or until the skin is deeply golden and releases easily from the pan.
Flip and Finish. Gently flip the salmon fillets. Cook for another 4 minutes on the flesh side or until the salmon is cooked to your desired doneness (125°F for medium-rare, 145°F for well-done).

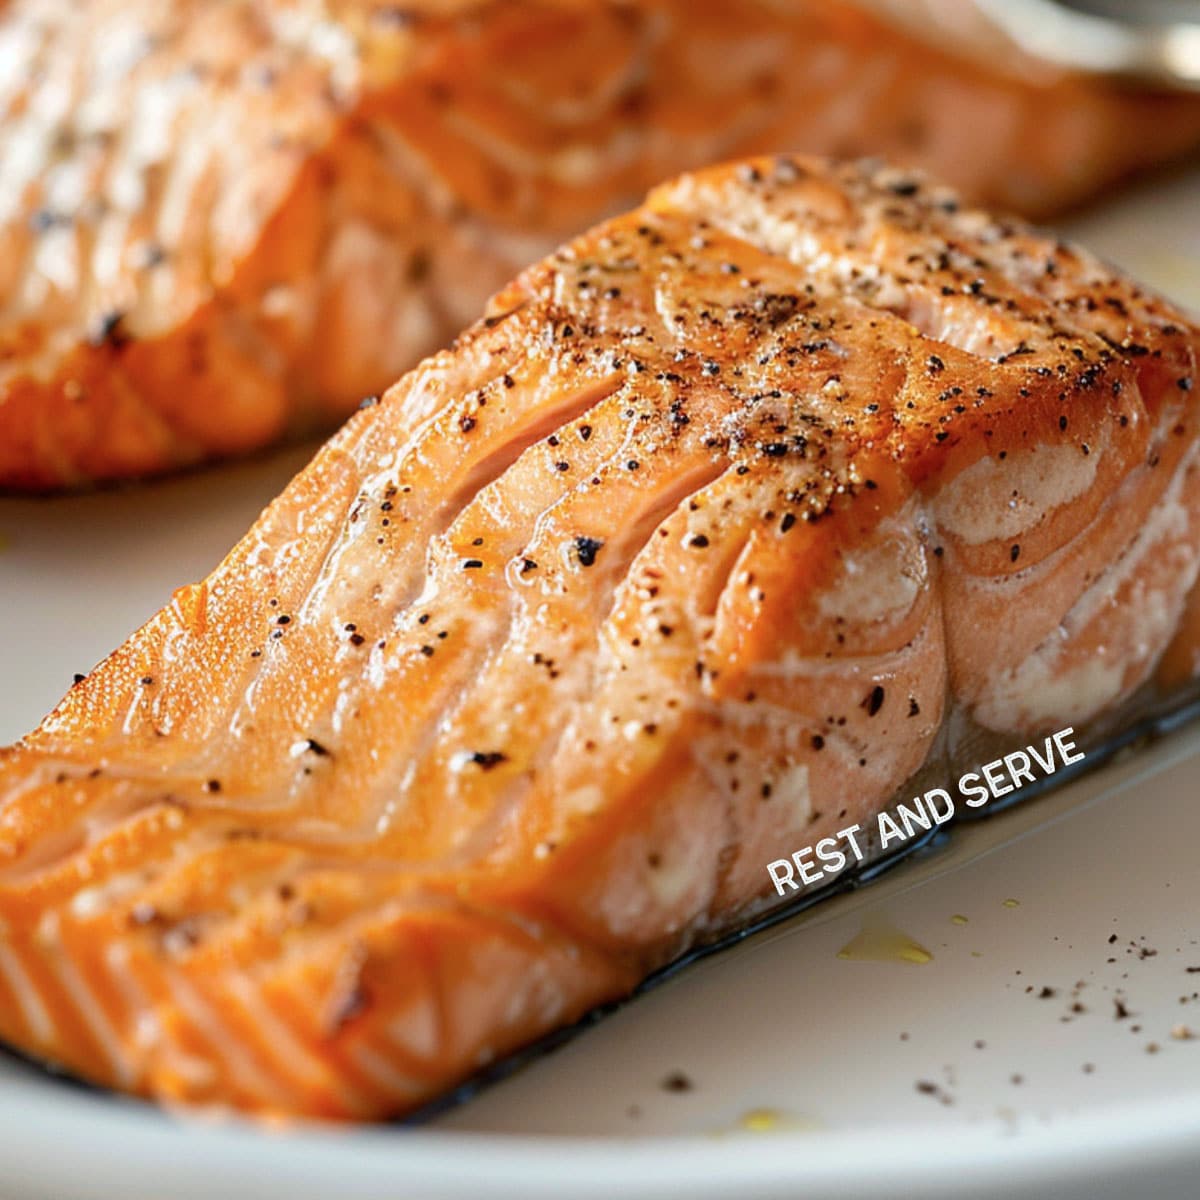
Rest and Serve. Remove the pan from heat and let the salmon rest for 5 minutes- this allows the internal temperature to even out, juices to redistribute, and the flesh to relax for the most tender result.
Serve immediately with your favorite sides and a finishing touch like a squeeze of lemon, a dollop of herb butter, or a sprinkle of fresh dill.
Achieving the Perfect Sear:
Temperature Control
- Importance of a Hot Pan: A screaming hot pan is non-negotiable. It allows for immediate searing, preventing the salmon from sticking and ensuring that a delicious crust forms.
- Signs of the Right Temperature:
- A drop of water flicked onto the pan should immediately sizzle and evaporate.
- Oil will shimmer and become slightly thinner, flowing easily across the pan.
- A wisp of smoke may start to appear - this is your cue to add the salmon!
Creating Crispy Texture
- Skin Side Down: Starting with the skin side down has multiple benefits:
- Protects the flesh: The skin acts as a barrier, preventing the delicate salmon from overcooking directly on the hot pan.
- Crispy Skin Delicacy: When done correctly, the skin becomes beautifully crackly and delicious in its own right.
- Flat fillet: Placing skin-side down helps keep the salmon from curling up, leading to more even cooking.
Avoiding Overcrowding
- Temperature Drop: Too many fillets in the pan significantly lower the overall temperature, leading to steaming rather than searing. This means soggy skin and no delicious crust.
- Uneven Cooking: Crowded salmon cooks unevenly. Some pieces will overcook while others remain underdone. Always cook in batches if needed!
Timing
- Guidelines: This varies based on thickness and type of cut, but a general rule is 6-7 minutes on the first side, then 2-4 minutes on the second (or until just cooked through).
- Don't Guess: Use an instant-read thermometer for the most accurate doneness. Aim for 125°F (52°C) for medium-rare or 145°F (63°C) for a more well-done salmon.
Flipping Techniques
- When to Flip:
- Visual Cues: The salmon should be opaque about halfway up the sides, and the skin should be golden brown and easily released from the pan.
- Gentle Nudge: If the salmon resists when you slide a spatula under it, it's not ready yet.
Finishing Touches
Resting Time
- Carryover Cooking: Salmon continues to cook slightly off the heat like a steak. Resting allows the heat to distribute evenly, preventing the center from overcooking while the edges cool too much.
- Juiciness: Resting allows the juices to re-absorb into the salmon's muscle fibers. Cutting into the fish too soon forces these juices out, resulting in a drier final product. Five minutes is a good resting rule.
Adding Flavors
- After the Sear: While salt and pepper pre-sear are essential, delicate herbs and complex sauces are best added after the initial cooking. This prevents them from burning and allows their flavors to shine through cleanly.
- Flavor Options:
- Pan Sauces: Deglaze the pan with white wine, lemon juice, or broth, then add butter, herbs, and aromatics for a quick, flavorful sauce.
- Fresh Herbs: Dill, parsley, cilantro, and chives add vibrant color and freshness.
- Spice Blends: A touch of Cajun seasoning, smoked paprika, or a simple lemon pepper blend can work wonders.
Serving Suggestions
Pairings
- Starchy Sides: Roasted potatoes, rice, couscous, or orzo pasta provide a satisfying textural balance.
- Light & Fresh: Salads (think peppery arugula or a crisp, lemony kale salad), or simple roasted vegetables like asparagus, broccoli, or Brussels sprouts. Boldly flavored vegetables can overpower the delicate salmon.
- Think Seasonally: Consider what's in season - summery corn (Elote), vibrant tomatoes - and build your pairings around that.
Presentation Tips
- Skin-on for Visuals: If you seared the salmon skin-side down, leaving the crispy skin on adds textural appeal.
- A Pop of Color: Garnish with a sprig of fresh herbs, a lemon wedge, or a sprinkle of something vibrant like pomegranate seeds or capers.
- Simple Plating: Don't overcrowd the plate - a well-seared salmon fillet speaks for itself.
Common Mistakes to Avoid
1 Overcooking: The Cardinal Sin of Salmon
- The Problem: Overcooked salmon is dry, flaky (in a bad way), and loses its beautiful color. It's a tragedy, but easily avoided!
- Prevention:
- Use a Thermometer: Don't just eyeball it! An instant-read thermometer is your best friend. Aim for 125°F (52°C) for medium-rare (the sweet spot) or 145°F (63°C) if you prefer it more well-done.
- Visual & Tactile Cues: Look for opaque sides, easy release from the pan, and firmness that gives slightly under pressure. But a thermometer is the safest bet.
2 Fiddling Too Much
- Problem: Constant poking and prodding disrupt that beautiful crust! Instead of a golden, caramelized surface, you end up with a pale, uneven sear and potential tearing of the salmon.
- Prevention: Patience is key! Once the salmon is in the hot pan, leave it undisturbed for most of the cooking time on each side. This allows that delightful crust to form properly.
- Peek if Tempted: If you absolutely must check, gently slide a thin spatula under an edge. If there is major resistance, wait another minute or two.
3 Starting with Cold Salmon
- Problem: A cold salmon dramatically drops the pan's temperature, preventing an optimal sear. You risk unevenly cooked fish with overdone edges and a potentially undercooked center.
- Prevention: Let the salmon rest at room temperature for 15 minutes before cooking. This ensures the fillet starts cooking at the ideal temperature, resulting in a more even sear and perfect doneness throughout.
4 Forgetting the Carryover Cooking
- Problem: Salmon continues to cook slightly even after it's removed from the pan. Overlooking this leads to tragically dry, overdone fish.
- Prevention: Factor in resting time! A simple 5-minute rest after cooking allows the internal temperature to even out and juices to redistribute, making for a succulent final product.
5 Not Using Enough Oil
- Problem: Too little oil means the salmon sticks to the pan, leading to frustration and potential tearing. You also lose out on even browning and proper crust formation.
- Prevention: Use a thin but visible layer of oil in the pan. It should coat the bottom evenly without pooling too deeply. Choose a high smoke-point oil to avoid burning.
6 Neglecting the Skin
- Problem: Skin-on salmon can curl up when it hits the hot pan, leading to uneven cooking and a less-than-appetizing presentation.
- Prevention: Score the skin with a few shallow cuts in a crosshatch pattern. This helps the salmon lay flat, cook evenly, and gives the skin extra surface area to get deliciously crispy.
7 Not Getting the Pan Hot Enough
- The Problem: A lukewarm pan won't create the immediate sizzle and crust formation that are the hallmarks of searing. Instead, the salmon might stick, release juices prematurely, and you'll end up with a pale, steamed-like texture rather than a flavorful, golden-brown crust.
- Prevention:
- Patience is Key: Give your pan plenty of time to heat up over medium-high heat. It might feel like an eternity, but it's worth it!
- The Water Drop Test: Flick a few drops of water onto the pan. They should immediately sizzle, dance around, and evaporate within seconds.
- Oil Gives Clues: Hot oil will shimmer and flow easily across the pan, becoming slightly thinner in consistency. A wisp of smoke is your final sign it's ready.
Additional Mistakes
- Inadequate Seasoning: Salt and pepper are non-negotiable! They bring out the salmon's natural flavor-season just before searing.
- Wrong Pan: Nonstick pans prevent a good crust. Heavy stainless steel or cast iron are the heroes for searing.
- Crowding: Too much salmon in the pan drops the temperature, resulting in steaming instead of searing. Batch cooking is your friend!
- Not Patting Dry: Excess moisture turns to steam in the pan, preventing a proper sear. Patting the salmon dry with paper towels is essential.
Full Recipe

Pan Seared Salmon Recipe
Pin RecipeEquipments:
- heavy bottomed stainless pan
- Fish spatula or other wide, thin spatula
- paper towel
Ingredients:
- 2 pcs skin-on salmon fillets
- 2 tablespoon olive oil (or another high smoke point oil)
- 1 tablespoon Salt
- 1 tablespoon ground black pepper
Optional:
- ½ tablespoon garlic powder
- ½ tablespoon smoked paprika
- ½ teaspoon cayenne pepper (optional if you want a little kick)
Instructions:
Prep the Salmon:
- Remove the salmon from the refrigerator and let it sit at room temperature for 15 minutes.
- Pat the salmon fillets dry with paper towels.

- Score the skin side of the salmon lightly in a crosshatch pattern.
- Season both sides of the salmon generously with salt and pepper, plus any optional spices.


Heat the Pan:
- Place your skillet over medium-high heat. Add the olive oil. Heat until the oil shimmers and a wisp of smoke just begins to appear. Salmon is naturally fatty, so you need minimal oil in the pan. A light greasing is all it takes to prevent sticking.
Sear the Salmon:
- Carefully place the salmon fillet, skin-side DOWN, in the hot pan. Don't overcrowd the pan (cook in batches if needed).
- Let the salmon sear undisturbed for about 7 minutes or until the skin is deeply golden and releases easily from the pan.

Flip and Finish:
- Gently flip the salmon fillets. Cook for another 4 minutes on the flesh side or until the salmon is cooked to your desired doneness (125°F for medium-rare, 145°F for well-done).

Rest and Serve:
- Remove the pan from heat and let the salmon rest for 5 minutes - this allows the internal temperature to even out, juices to redistribute, and the flesh to relax for the most tender result.
- Serve immediately with your favorite sides and a finishing touch like a squeeze of lemon, a dollop of herb butter, or a sprinkle of fresh dill.
Notes:
Extra Tips:
- Always pat your salmon dry before searing for the best crust.
- Don't overcrowd the pan - cook in batches if needed.
- Use an instant-read thermometer for the most accurate doneness.
- For extra crispy skin, start the searing process with a slightly higher heat, then reduce to medium-high after a minute.
- Don't be afraid of a little smoke while searing - that's where the flavor comes from!
Achieving the perfect sear:
Temperature control
- Importance of a Hot Pan: A screaming hot pan is non-negotiable. It allows for immediate searing, preventing the salmon from sticking and ensuring that a delicious crust forms.
- Signs of the Right Temperature:
- A drop of water flicked onto the pan should immediately sizzle and evaporate.
- Oil will shimmer and become slightly thinner, flowing easily across the pan.
- A wisp of smoke may start to appear - this is your cue to add the salmon!
Creating crispy texture
- Skin Side Down: Starting with the skin side down has multiple benefits:
- Protects the flesh: The skin acts as a barrier, preventing the delicate salmon from overcooking directly on the hot pan.
- Crispy Skin Delicacy: When done correctly, the skin becomes beautifully crackly and delicious in its own right.
- Flat fillet: Placing skin-side down helps keep the salmon from curling up, leading to more even cooking.
Nutrition Information:
Please note that all nutrition information are just estimates. Values will vary among brands, so we encourage you to calculate these on your own for most accurate results.