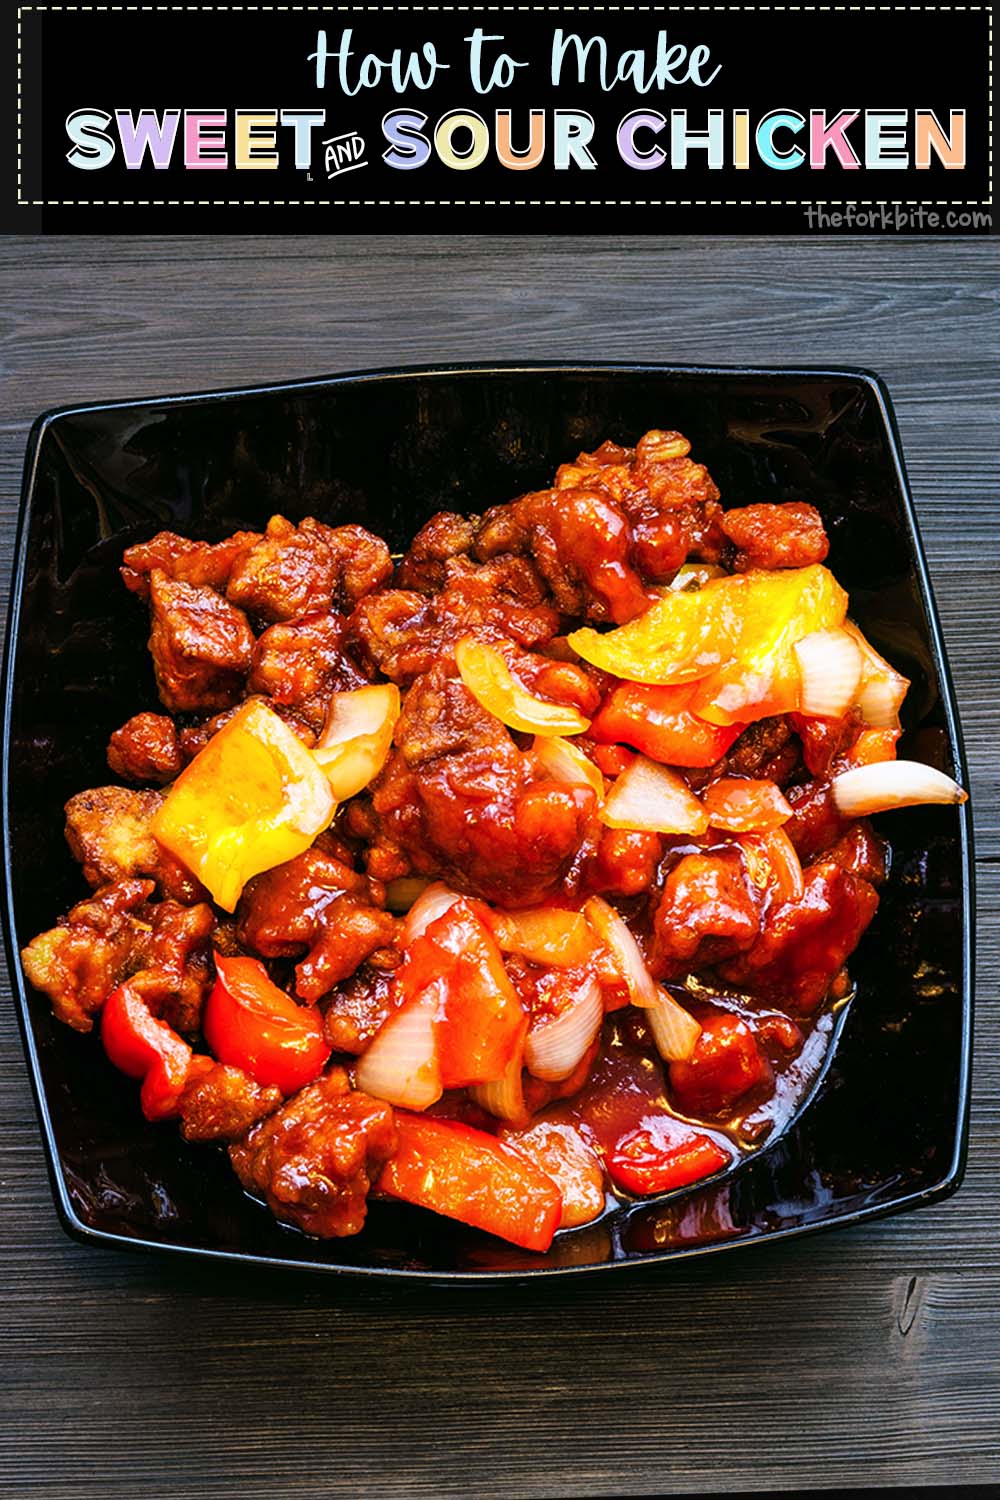
I am about to reveal the recipe for the best-ever sweet-and-sour chicken that contains bell peppers, carrots, onions, pineapple, and of course, chicken.
It's an all-in-one wonder that doesn't need extra veggies.
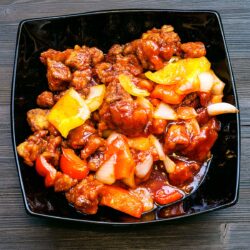
If you've been searching for a simple sweet-and-sour chicken recipe with a gorgeous sticky, gloriously tasty sauce, search no more. It's right here.
The best sweet and sour chicken recipe
I know it's a big claim to live up to, but trust me, this recipe does live up to the billing I've given it.
You might think you got the best homemade recipe that outdoes any takeout option.
Forget Kikkoman, Contadina, Lee Kum Kee, and Kraft sweet and sour sauces.
This recipe is healthier than any bottled sweet-and-sour sauce or any takeout version you might have previously enjoyed.
I'm going to show you that you don't have to sacrifice taste to eat healthily.
It's just as good as my recipe for General Tso's chicken, and if you don't believe me, you've got to try both. They will open your eyes and treat your tastebuds to flavor paradise.
What I like about this recipe is that you can bake it in your oven.
You can avoid all that last-minute faffing around and concentrate on your guests while the meal cooks itself.
How to make sweet and sour chicken
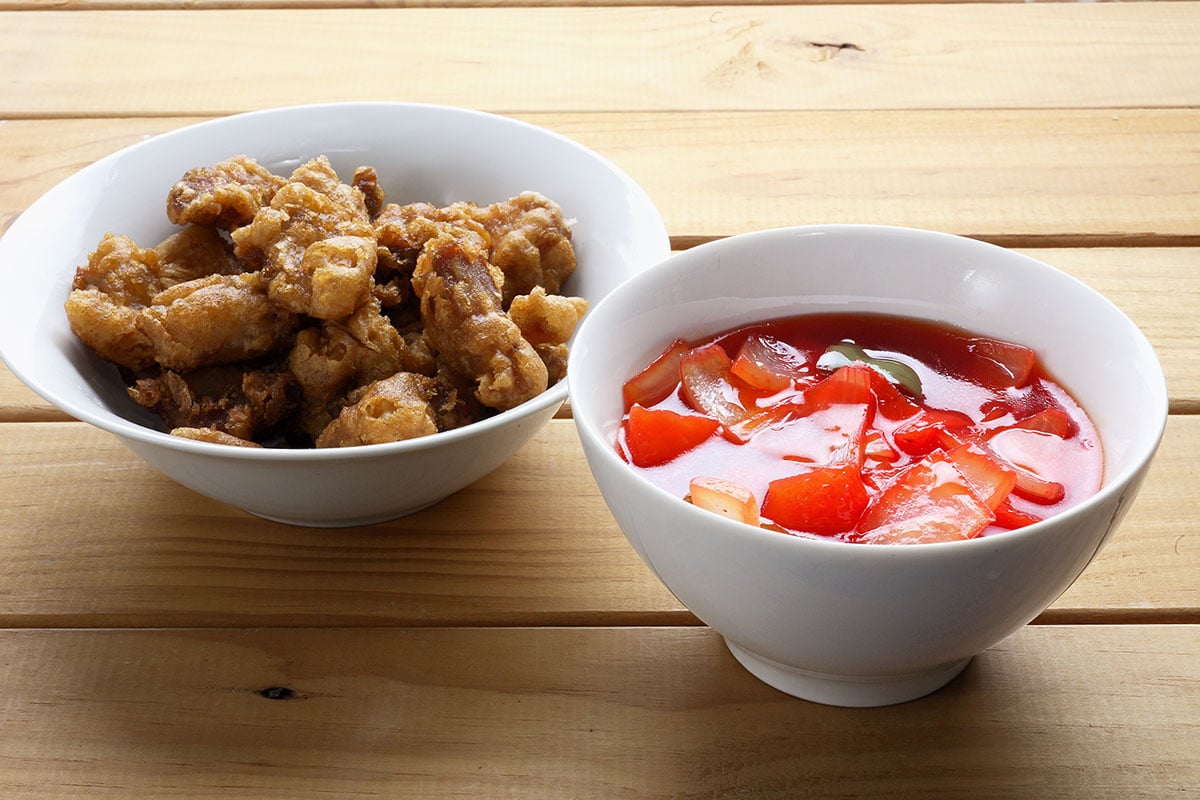
1 First step - the coating
The coating in this sweet and sour chicken recipe is all-important.
It not only gives the chicken a unique texture it also helps to thicken the utterly delicious sauce. It's a three-step process.
- First, the eggs. An essential step in the coating process.
- Next, the flour. I normally use regular, all-purpose flour, but gluten-free flour is an option if you have someone in the family or a gluten-intolerant guest.
- Last but not least, seasoned cornstarch.
The order of the steps might not seem right at first. But please - trust me - this is the right way to do it.
Adding the cornstarch right at the end is the secret to getting a wonderfully light coating.
You can just add ordinary cornstarch, but I recommend seasoning it to get the maximum flavor.
This is a step that many of the sweet-and-sour recipes around omit, which is one reason why this recipe is the best.
It's vitally important to make sure that every component of a sweet-and-sour chicken recipe is properly seasoned.

2 Sweet-and-sour sauce
Here are all the ingredients needed to make my delicious DIY sweet-and-sour sauce:
- A splash of red wine vinegar-- This is what gives the sauce of its lovely tang. It works with pineapple juice to provide you with that gorgeous sweet-and-sour character. Don't use any other type. It has to be red wine vinegar.
- Pineapple juice-- I usually use a 20-ounce pineapple tidbit can - just the juice.
- Granulated white sugar-- This is added to balance the sweet with the sour. Whatever you do, don't add brown sugar as a substitute because it will give the dish a taste of molasses. Granulated sugar allows those lovely citrus flavors to shine through.
- Tomato ketchup-- Although it might sound a bit strange at first, tomato ketchup works brilliantly because it adds a lovely sweet tomato taste.
- Sliced onion-- Onion is another thing that adds an excellent sweet flavor, but you must be sure to simmer it well to get rid of the taste of raw onion. It's crucial because it compliments the overall sweetness of the sauce so well.
- Low sodium soy sauce-- I prefer the low sodium soy sauce option because it helps control the finished dish's saltiness.
- Four cloves of garlic-- No need to explain the need for garlic. It's indispensable.
- Various spices-- Ground ginger is a must for its warmth, as is a little salt and a sprinkling of red pepper flakes to add a little kick.
Anyone who wants to lessen the amount of sugar used in the recipe can do so.
Still, to keep the correct balance between sweet and sour, you will also have to lessen the quantity of red wine vinegar and tomato ketchup proportionately.
These are the tangy elements that will otherwise overpower.
In other words, if you reduce the sugar without lessening the amount of the other ingredients, you will end up with sharp and sour rather than sweet-and-sour.
3 Other ingredients
As well as chicken, for this recipe, you will need:
- Pineapple pieces- Remember that we listed the pineapple juice from a 20 oz can of pineapple tidbits in our sauce ingredients. If you're using the liquid from canned pineapple, you can also use the pineapple pieces or tidbits. If you're using fresh pineapple (which is an option), you'll need to buy and add pineapple juice.
- Red and green bell peppers- You need one of each to chop into small approximate 1-inch square pieces. They are vital to the overall flavor is so make sure you include them.
- Carrots (sliced) are quite dense and can take a long time to cook, so you need to slice them nice and thin.
Step by step instructions
Step 1 Prep the ingredients
- Prepare and mix all the ingredients for the sweet-and-sour sauce in a pan. Bring the mixture to a boil and let it simmers to gently soften the onions and blend the flavors while stirring occasionally.
- While doing the gentle simmers, you can prepare your chicken meat and veggies.
- Let it simmers for 10 to 15 minutes max. Turn off the heat.
Step 2 Coating the chicken
- In a separate bowl, whisk the eggs and set aside. Pour ½ cup of flour into a Ziploc bag, set aside and put it next to the beaten eggs.
- Now, in another bowl, whisk the cornstarch, salt, pepper, ginger powder, garlic powder, onion powder. Set aside next to the 2 breading ingredients.
- Dredge the chicken in beaten eggs to get a better coating. Then remove while allowing excess eggs to drip off.
- Place the coated chicken into the Ziploc bag with flour. Toss until evenly coated and get rid of any excess flour.
- Once you've discarded any extra flour, pour in the cornstarch/spices mix into the Ziploc bag and shake until evenly coated.
Note:
I favor tossing the chicken in a freezer bag or similar to coat and flour/breaded it rather than dredging it and getting my fingers all sticky and gooey. It's very straightforward. It's only me 🙂
Step 3 Browning the chicken
Once the chicken has been coated, the next step is to brown it, and to do this; you can toast it in a hot skillet. This helps to keep the chicken intact and also gives it that unique and unmistakable Chinese chicken texture.
- In a large skillet, pour enough oil to coat or cover the bottom of the pan.
- Heat the oil until hot and rippling. Once the oil is hot, you can cook the chicken for 1 minute each side or until both sides are browned but NOT cooked through.
- You can achieve this by cooking the chicken in batches but it all depends on the size of your skillet.
- Once the chicken is browned, you can move or arrange it to a nicely greased baking dish for the final step.
Step 4 The final baking
- Preheat oven to 350°F
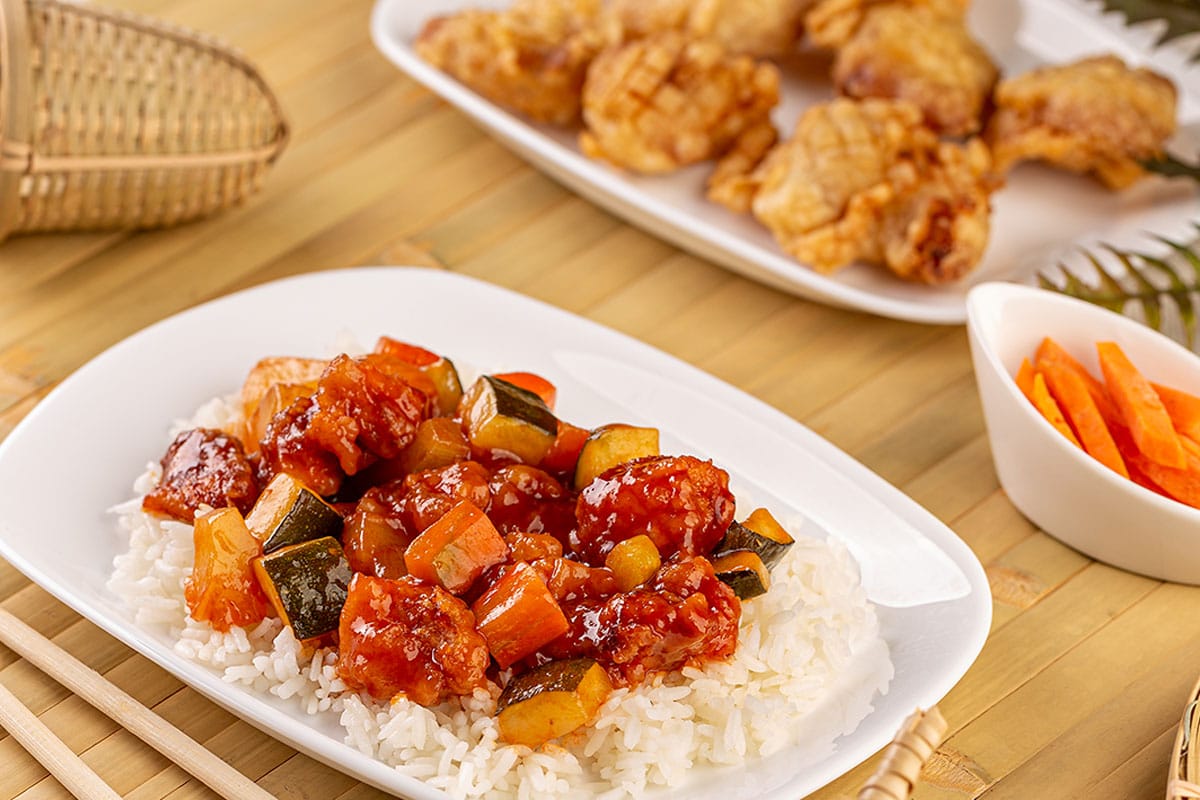
- Now, you can add the bell peppers and carrots to the simmered sweet and sour mixture. Mix well to combine.
- Pour the simmered sauce over the chicken. Gently mix until evenly coated.
- Return it to the oven, then bake for approximately 30 to 40 minutes uncovered or until the sauce thickens. Stir occasionally.
- Although the chicken takes less than 30 minutes to cook, if left longer, the sauce's flavor is absorbed by the chicken and the veggies to create that gorgeous sweet-and-sour chicken dish for which you were hoping.
- Serve over jasmine rice and enjoy.
Useful tips:
- Try not to chop the chicken too small. Aim for pieces about one inch thick, a little thicker if anything. If you cut them too small, they will become dry and tough.
- Make sure that each piece of chicken is evenly coated. If you spot any partially covered chicken pieces in the bag, give it another good shake to make sure everything is thoroughly coated.
- Before adding the flour to the egg-soaked chicken, feather the chicken lightly with a kitchen towel to remove any excess egg mixture. Return to the bag, add the flour and shake to coat.
- Remove any excess flour by transferring the coated chicken into a strainer and gently tossing them to shake off any excess.
Other chicken recipes:
Preparing sweet-and-sour chicken in advance
If you always find yourself in a bit of a rush and lost for a time, you can prepare elements of this sweet-and-sour chicken recipe in advance.
1 The sweet-and-sour sauce
You can prepare this in advance by whisking all the ingredients together, but instead of cooking them, you can transfer them into an airtight container and store them in your fridge.
2 The coating
You can mix all the ingredients for the flour and transfer them to a zip lock freezer bag and store them for several weeks.
Or you can coat the chicken, move it into an airtight container, and then store it in your fridge for a day or two.
3 The vegetables
Similarly, the vegetables can be chopped, transferred to an airtight container or Ziploc bag, and refrigerated for one or two days.
4 Setting the coated uncooked chicken aside.
If you are really up against it time-wise, you can buy yourself a little time by transferring the coated chicken onto a greased cooking rack (placed on top of a baking sheet).
And cover it with foil or plastic food wrap and leave it out at room temperature for as long as 20 minutes.
It just might help you to juggle around a few things if you are pushed for time.
How to store sweet and sour chicken
Nearly all cooked dishes are best served fresh as they are at their best in terms of flavor and texture.
And when chicken, in particular, is still nice and juicy. Unfortunately, leftover chicken is no longer as crispy as it should be; however, it is still quite delicious.
- Any leftovers of sweet-and-sour chicken you might have can be transferred into an airtight container and keep in your fridge for up to five days.
- It's best to store the chicken and the sauce separately to keep the chicken as crispy as possible.
- Don't forget to pat the chicken down with a paper kitchen towel to remove as much sauce as possible before you pop it into the freezer.
How to reheat sweet and sour chicken
You can reheat homemade sweet-and-sour chicken that has been stored in the fridge.
On your stovetop, pour a small quantity of canola, peanut, or vegetable oil into a pan and set over medium heat.
Once the oil reaches temperature, add the sweet-and-sour chicken and heat gently, occasionally stirring, until it reaches the desired temperature.
Alternatively, you can opt to reheat it in the microwave.
It's not my favorite method because the chicken can get a little rubbery, and the coating will no longer be crisp.
Reheating using an air fryer
You can check my detailed post here to learn the best way to reheat the sweet and sour chicken.
Can you freeze sweet and sour chicken
If you plan to make a batch of homemade Chinese sweet-and-sour chicken for freezing, I find it's best to freeze the chicken separately from the sauce and omit the bell peppers so they don't become too soggy.
Freezing without the sauce
By separating the chicken from the sweet-and-sour sauce, you can freeze it while still protecting its crispiness.
Once you've finished cooking the dish, take it out of the oven and allow it to cool at room temperature
- When sufficiently cool, separate the chicken from the sauce and transfer it onto a baking sheet.
- Ensure the pieces of chicken are spaced well apart, and then transfer the sheet into your freezer.
- Allow the chicken to freeze for between one and two hours, and once solid, you can put it into a Ziploc freezer bag, remove as much air as possible, seal, label, and store it in your freezer.
- The sweet-and-sour sauce, complete with veggies but without the bell peppers, should then be transferred to a separate airtight container or Ziploc freezer bag.
- Again, evacuate as much air as possible, seal, label, date, and transfer to the freezer.
Before reheating, you need to defrost both the chicken and the sauce overnight in your fridge.
The next day you can transfer the chicken and the sauce into a frying pan or wok and stir-fry.
Freezing with the sauce
As I already mentioned above, it's best to take out the bell peppers before freezing; otherwise, they will become somewhat mushy when they defrost.
- Remove the sweet-and-sour chicken from the oven and allow it to cool at room temperature.
- Once cool, transfer into large or small Ziploc freezer bags depending on the serving sizes you want to reheat.
- Remove as much air from the bag as you can, seal and label. You can store it in your freezer for up to three months.
- Before reheating, defrost overnight in your fridge.
- You can reheat on your stovetop in either a frying pan or a wok and three minutes before serving, add fresh bell peppers.
Can you make sweet-and-sour chicken without vinegar?
Nearly all recipes you will come across for sweet-and-sour chicken will call up vinegar in the ingredients. However, you can use alternatives if you wish.
Sour or bitter flavored fruits in dried, liquid, or semi-solid states are often used instead of vinegar to add the necessary tanginess.
Some recipes omit vinegar completely and instead call up lemon or lime juice, mango powder, or tamarind paste, each of which has its particular sour taste.
1 Adding citrus fruits
Citrus fruits are often used instead of vinegar in some classic sweet-and-sour dishes. The classic ones are lemon and lime juice.
In French cuisine, there is a recipe for sweet-and-sour glazed carrots on the Food and Wine website based on a Jean-Georges Vongerichten creation using orange and lemon juice plus elderflower cordial.
2 Tamarind paste
It's a bit different. Tamarind paste is derived from tamarind fruit, which grows on trees primarily found in Africa and India.
Tamarind paste is used frequently in Thai cuisine and Indian curries. Although it contains some natural sugar, it is more than offset by the 12% tartaric acid, which gives it its tartness.
Malaysian cuisine uses it as a souring agent for things like Asan Laksa.
But coming back to Asian cuisine, there are other things you can use instead of vinegar to add that sour notes.
You can make a delicious sweet-and-sour dipping sauce using tamarind extract with brown sugar, dates, seasoning, and hot water.
Check my recipe for Pad Thai Sauce with tamarind paste
3 Mango powder
Mango Powder, also known as Amchoor or dried mango powder, comes from unripened green mangoes dried in the sun.
The powder these mangoes make has a sweet and fruity but tangy taste, often used in Japanese cuisine, curries, Asian marinades, and stir-fries.
It also tenderizes meats. You can purchase it in Asian grocery stores.
4 Ascorbic acid
Ascorbic Acid, the scientific name for vitamin C, is also used as an alternative to vinegar.
If you are amine sensitive, you may benefit from replacing white wine vinegar with sorbic acid and water with a bit of added apple juice.
You can purchase Ascorbic acid in powder form in most pharmacies and health food stores.
Final thoughts
So there you have it, my recipe for the best DIY Chinese sweet-and-sour chicken. This oven-baked version is less calorific than stir-fry variants made with off-the-shelf bottled sweet-and-sour sauces.
I've also included some alternatives to things like vinegar for those of you who may have amine sensitivity.
Full Recipe
Baked Sweet and Sour Chicken Recipe
Pin RecipeIngredients:
- 1½ lbs Boneless skinless chicken breast cut in bite-size
1st Breading:
- 3 pcs Eggs (beaten)
2nd Breading:
- ½ cup flour
3rd Breading:
- 1⅓ cup cornstarch
- ¼ teaspoon ginger powder
- ¼ teaspoon black pepper
- ¼ teaspoon onion powder
- ½ teaspoon garlic powder
- ½ teaspoon salt
Sweet and Sour Sauce:
- ½ cup Pineapple juice (from 20 oz. pineapple tidbits can)
- 1½ cups granulated sugar
- 1 cup Red wine vinegar
- ¼ cup Ketchup (+ 2 tbsp)
- 2 tablespoon Soy sauce
- 1 onion (diced)
- 1 teaspoon salt
- ½ teaspoon red pepper flakes
- ½ teaspoon ginger powder
- 4 cloves garlic (minced)
Other Ingredients:
- 1 green bell pepper
- 1 red bell pepper
- 2 piece carrots medium-sized (sliced)
- 20 oz pineapple tidbits (from one can)
Instructions:
Step 1: Prep the ingredients
- Prepare and mix all the ingredients for the sweet-and-sour sauce in a pan. Bring the mixture to a boil and let it simmers to gently soften the onions and blend the flavors while stirring occasionally.
- While doing the gentle simmers, you can prepare your chicken meat and veggies.
- Let it simmers for 10 to 15 minutes max. Turn off the heat.
Step 2: Coating a Chicken
- In a separate bowl, whisk the eggs and set aside. Pour ½ cup of flour into a Ziploc bag, set aside and put it next to the beaten eggs.
- Now, in another bowl, whisk the cornstarch, salt, pepper, ginger powder, garlic powder, onion powder. Set aside next to the 2 breading ingredients.
- Dredge the chicken in beaten eggs to get a better coating. Then remove while allowing excess eggs to drip off.
- Place the coated chicken into the Ziploc bag with flour. Toss until evenly coated and get rid of any excess flour.
- Once you've discarded any extra flour, pour in the cornstarch/spices mix into the Ziploc bag and shake until evenly coated.
Step 3: Browning the Chicken
- In a large skillet, pour enough oil to coat or cover the bottom of the pan.
- Heat the oil until hot and rippling. Once the oil is hot, you can cook the chicken for 1 minute each side or until both sides are browned but NOT cooked through.
- You can achieve this by cooking the chicken in batches but it all depends on the size of your skillet.
- Once the chicken is browned, you can move or arrange it to a nicely greased baking dish for the final step.
Step 4: Final Baking
- Preheat oven to 350°F
- Now, you can add the bell peppers and carrots to the simmered sweet and sour mixture. Mix well to combine.
- Pour the simmered sauce over the chicken. Gently mix until evenly coated.
- Return it to the oven, then bake for approximately 30 to 40 minutes uncovered or until the sauce thickens. Stir occasionally.
- Although the chicken takes less than 30 minutes to cook, if left longer, the sauce's flavor is absorbed by the chicken and the veggies to create that gorgeous sweet-and-sour chicken dish for which you were hoping.
- Serve over jasmine rice and enjoy.
Notes:
Useful tips:
- Try not to chop the chicken too small. Aim for pieces about one inch thick, a little thicker if anything. If you cut them too small, they will become dry and tough.
- Make sure that each piece of chicken is evenly coated. If you spot any partially covered chicken pieces in the bag, give it another good shake to make sure everything is thoroughly coated.
- Before adding the flour to the egg-soaked chicken, feather the chicken lightly with a kitchen towel to remove any excess egg mixture. Return to the bag, add the flour and shake to coat.
- Remove any excess flour by transferring the coated chicken into a strainer and gently tossing them to shake off any excess.
Nutrition Information:
Please note that all nutrition information are just estimates. Values will vary among brands, so we encourage you to calculate these on your own for most accurate results.