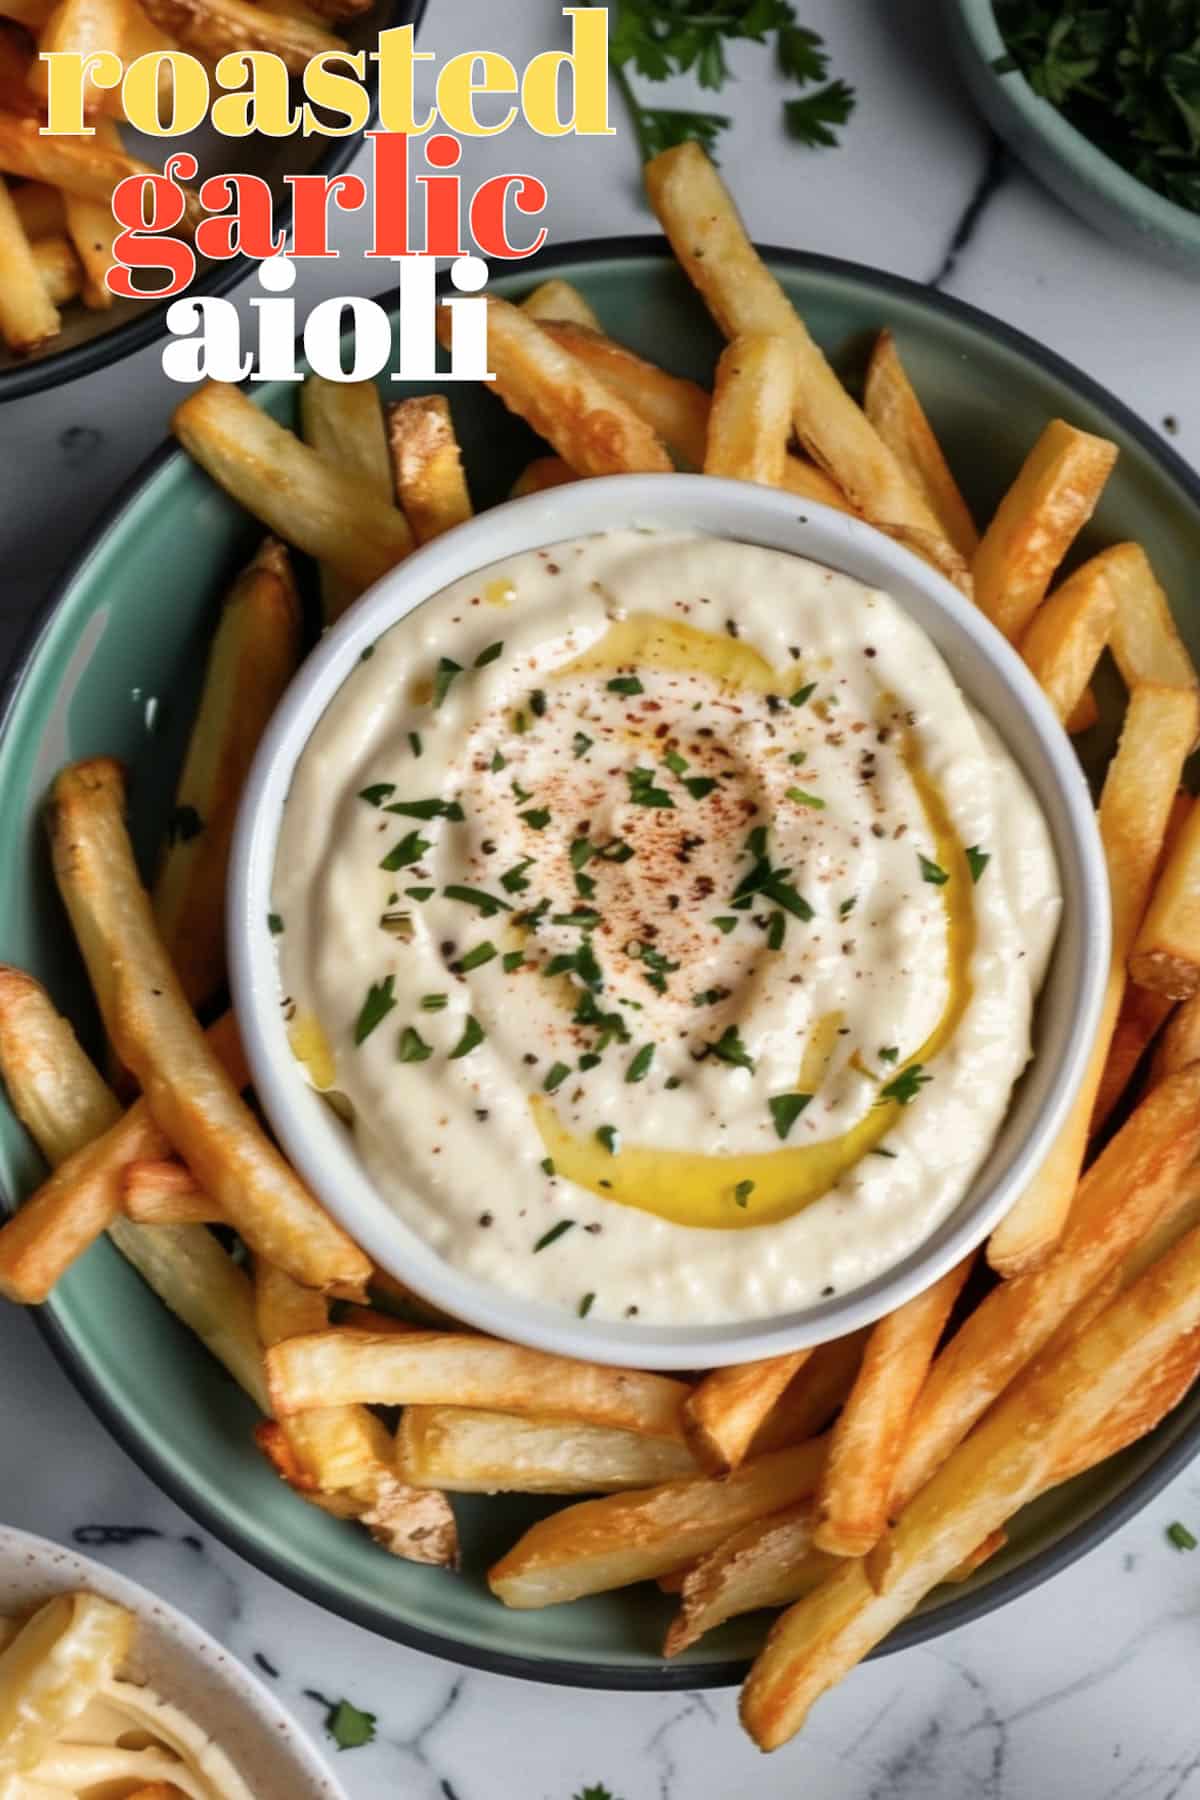
Okay, seriously, I'm obsessed with this Roasted Garlic Aioli. Homemade aioli is ridiculously easy, and this roasted garlic version? You'll never want that store-bought stuff again. I'm not even kidding when I say it's the best aioli ever - creamy, garlicky, with that roasted sweetness... it's totally addictive. Honestly, who needs fries when you could just eat this stuff with a spoon?"
Jump to:
What is Aioli?
Picture this: garlicky, creamy deliciousness. Traditionally, aioli was all about garlic mashed with olive oil - simple, but seriously tasty.
Mayo vs. Aioli: What's the Deal? Classic aioli was totally garlic-powered. Mayo, on the other hand, uses egg yolks to make things creamy, and usually has stuff like mustard and lemon juice for extra flavor.
Aioli Nowadays: Is it Even Aioli Anymore? Honestly, things get blurry! These days, "aioli" often just means garlic-flavored mayo. Confusing, right? Good news is, it'll still taste awesome on those fries.
Roasted Garlic Aioli: The Flavor Upgrade
Okay, usually aioli means serious garlic punch, which is great! But sometimes that raw garlic can be a bit intense, right? That's where roasted garlic comes in to save the day.
Why Roast Garlic?
Roasting garlic is like magic. It turns that harsh garlic bite into this sweet, mellow, almost nutty flavor. Plus, it gets super soft, so it blends like a dream into creamy aioli. Basically, you get all that delicious garlic goodness without it taking over your whole dish.
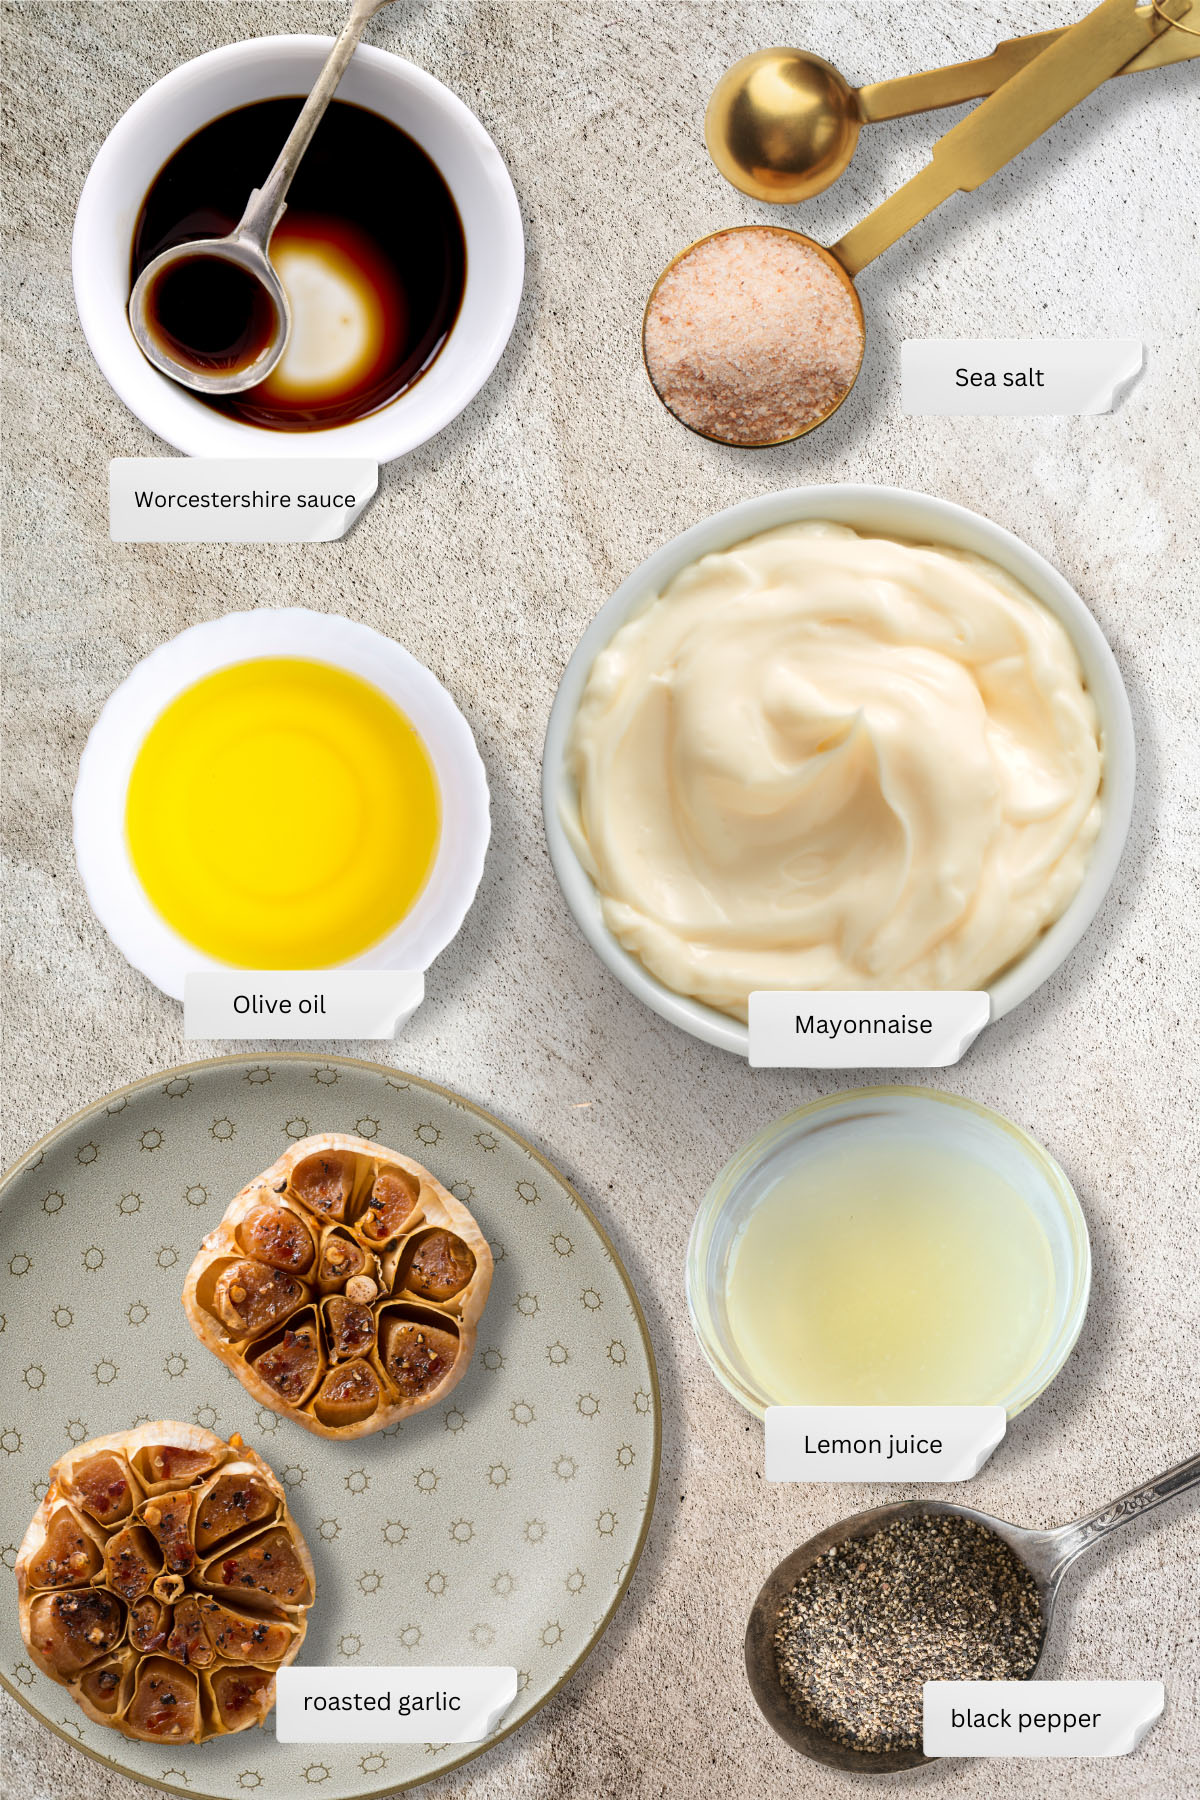
Ingredients You'll Need (with Mayonnaise):
- Roasted Garlic Heads: The heart and soul of the aioli! Roasting mellows garlic's intensity and brings out its sweet, nutty notes.
- Mayonnaise: The base that provides creaminess and body. Store-bought is perfect for convenience, or you can opt for homemade mayonnaise for richer flavor.
- Olive Oil: Enhances the richness of the aioli and contributes to its smooth texture. Choose a good quality olive oil for the best results.
- Lemon Juice (Freshly Squeezed): Adds a bright, acidic counterpoint to the richness of the mayonnaise and oil. Freshly squeezed lemon provides the most vibrant flavor.
- Worcestershire Sauce: Provides depth, savoriness ("umami"), and a hint of tanginess that complements the other ingredients perfectly.
- Salt and Pepper: Essential for seasoning the aioli. Sea salt or kosher salt is preferable for a clean flavor, and adjust pepper to your taste.
Important Note: This version of Roasted Garlic Aioli is a delicious and time-saving variation. However, a classic aioli recipe would traditionally use egg yolk as the emulsifier instead of mayonnaise.
Step by Step Instructions
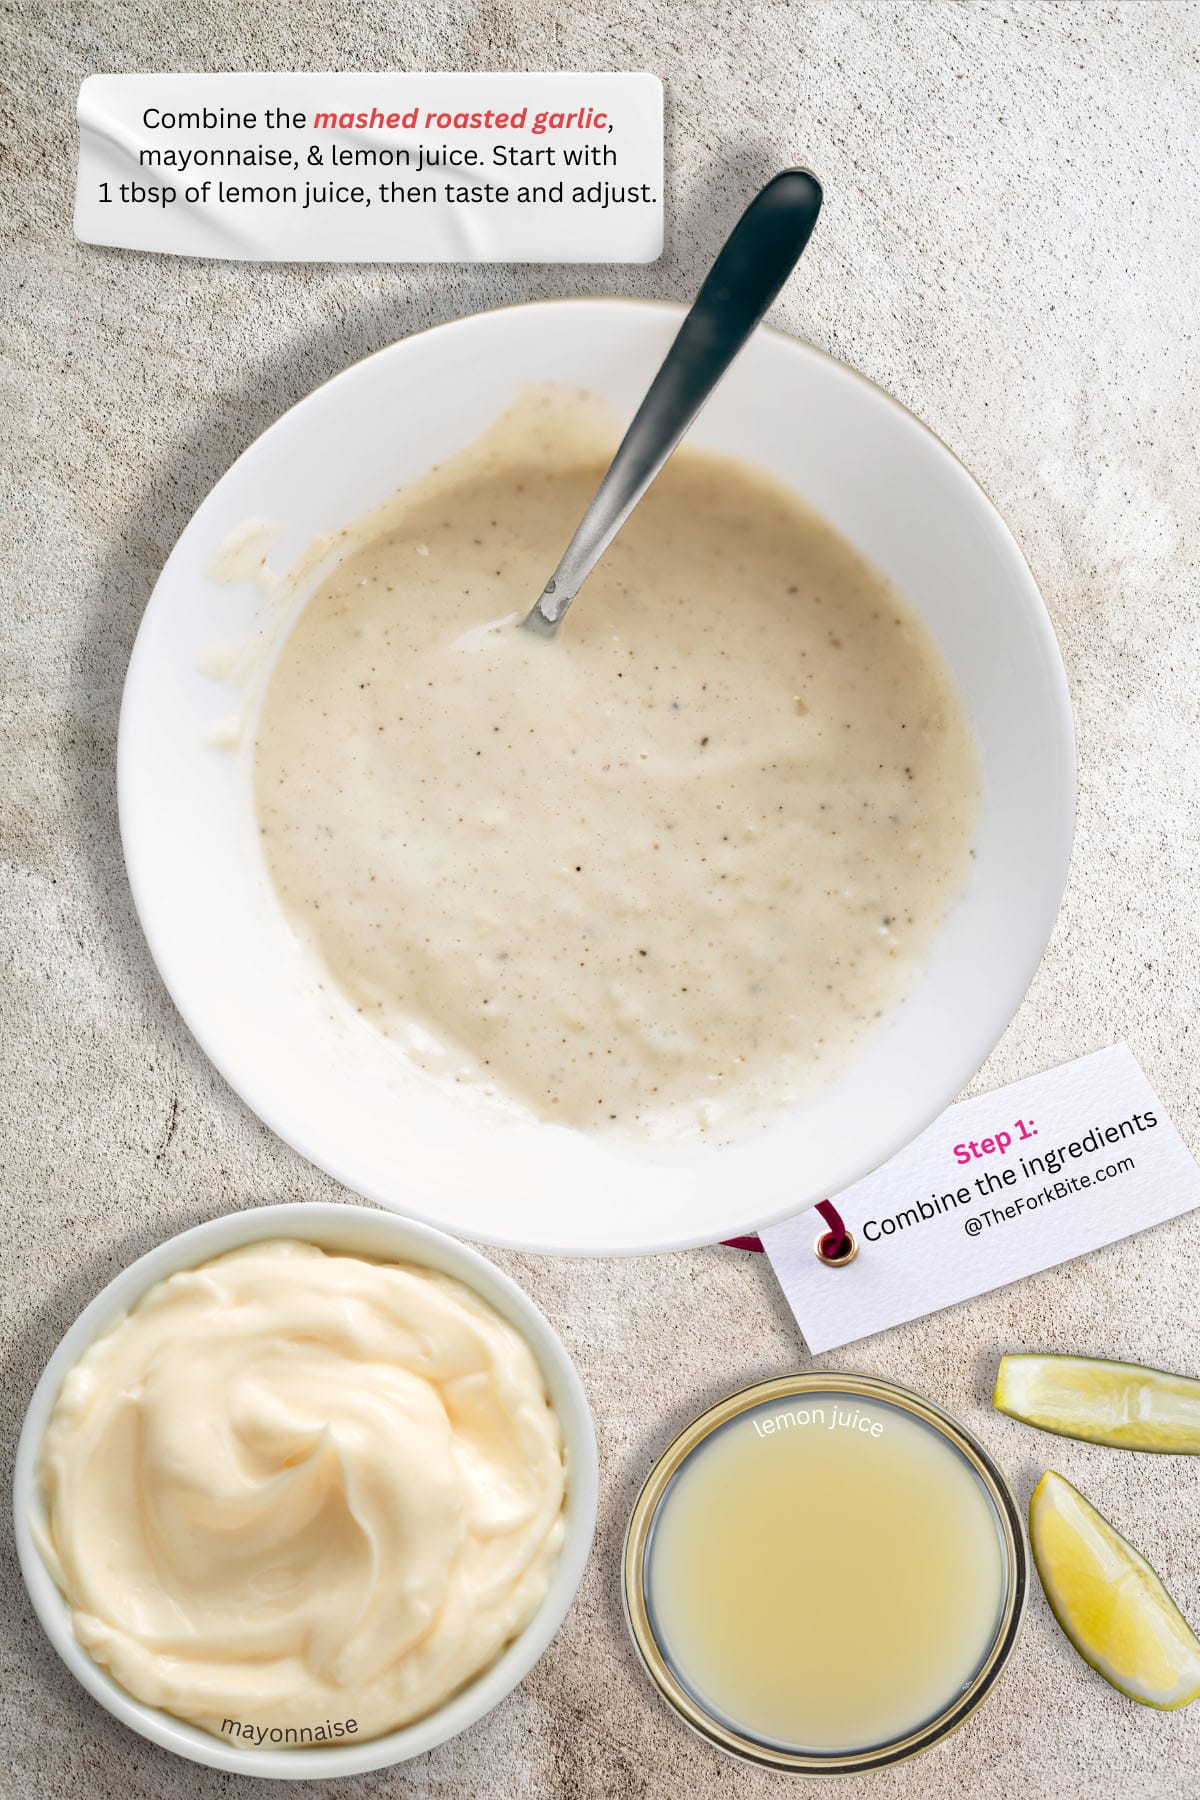
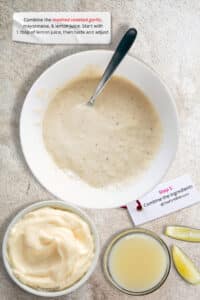
Combine and Mix. In a medium bowl, combine the mashed roasted garlic, mayonnaise, and lemon juice. Start with 1 tablespoon of lemon juice, then taste and adjust.
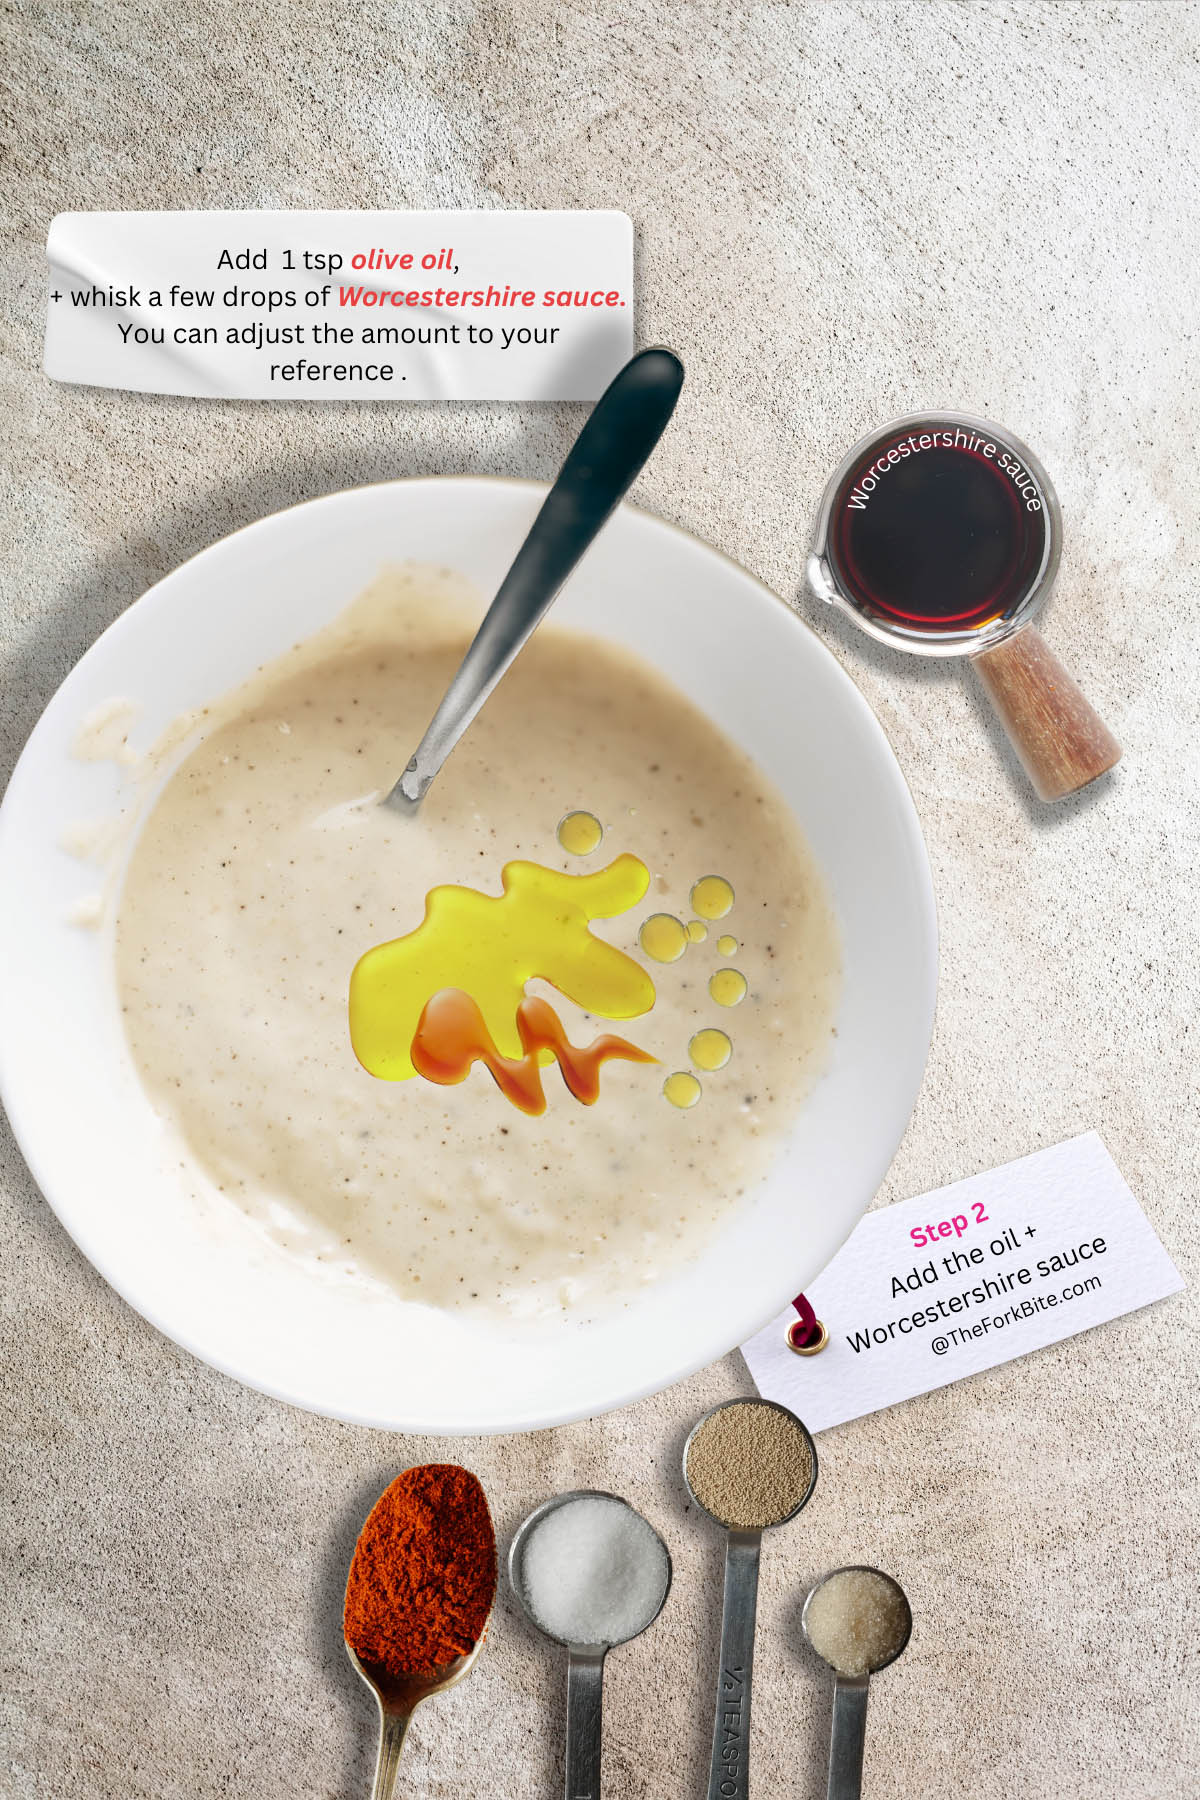
Slow and Steady. Whisk in the olive oil gradually, starting with a teaspoon at a time. This allows it to emulsify smoothly, creating a luxurious, creamy texture.
Taste as You Go: Keep tasting your aioli as you add oil until it reaches your desired richness. Olive oil adds a lovely fruitiness and smoothness to your aioli. Choose a good quality one for the best results.
Worcestershire Adds Complexity. Right after incorporating the olive oil, whisk in a few drops (roughly ½ teaspoon) of Worcestershire sauce. This provides a hint of savory depth and a subtle tang ('umami'). You can add a little more if you like a stronger flavor.
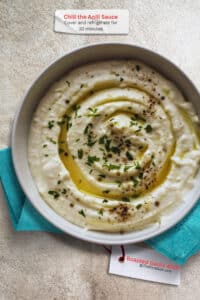
Season to Perfection.
Add salt and pepper to taste. Start with a small amount and adjust until the aioli reaches your desired flavor.
Chill and Enjoy. Cover and refrigerate your Roasted Garlic Aioli for at least 30 minutes to allow the flavors to meld. This also helps thicken it slightly. Then, dig in!

How to Roast Garlic
Roasted garlic adds incredible depth to this creamy aioli recipe. Not sure how to transform those cloves into sweet, mellow goodness? Check out my complete guide on How To Roast Garlic and get ready for garlicky greatness!
Step 1 Preheat and Prep
- Begin by cranking up your oven to a toasty 400°F (200°C). This heat ensures the garlic cloves caramelize beautifully, developing their signature sweetness.
- Select three plump, whole heads of garlic. There's no need to peel the cloves - those papery skins help keep the garlic moist during roasting.
Step 2 Trim and Season
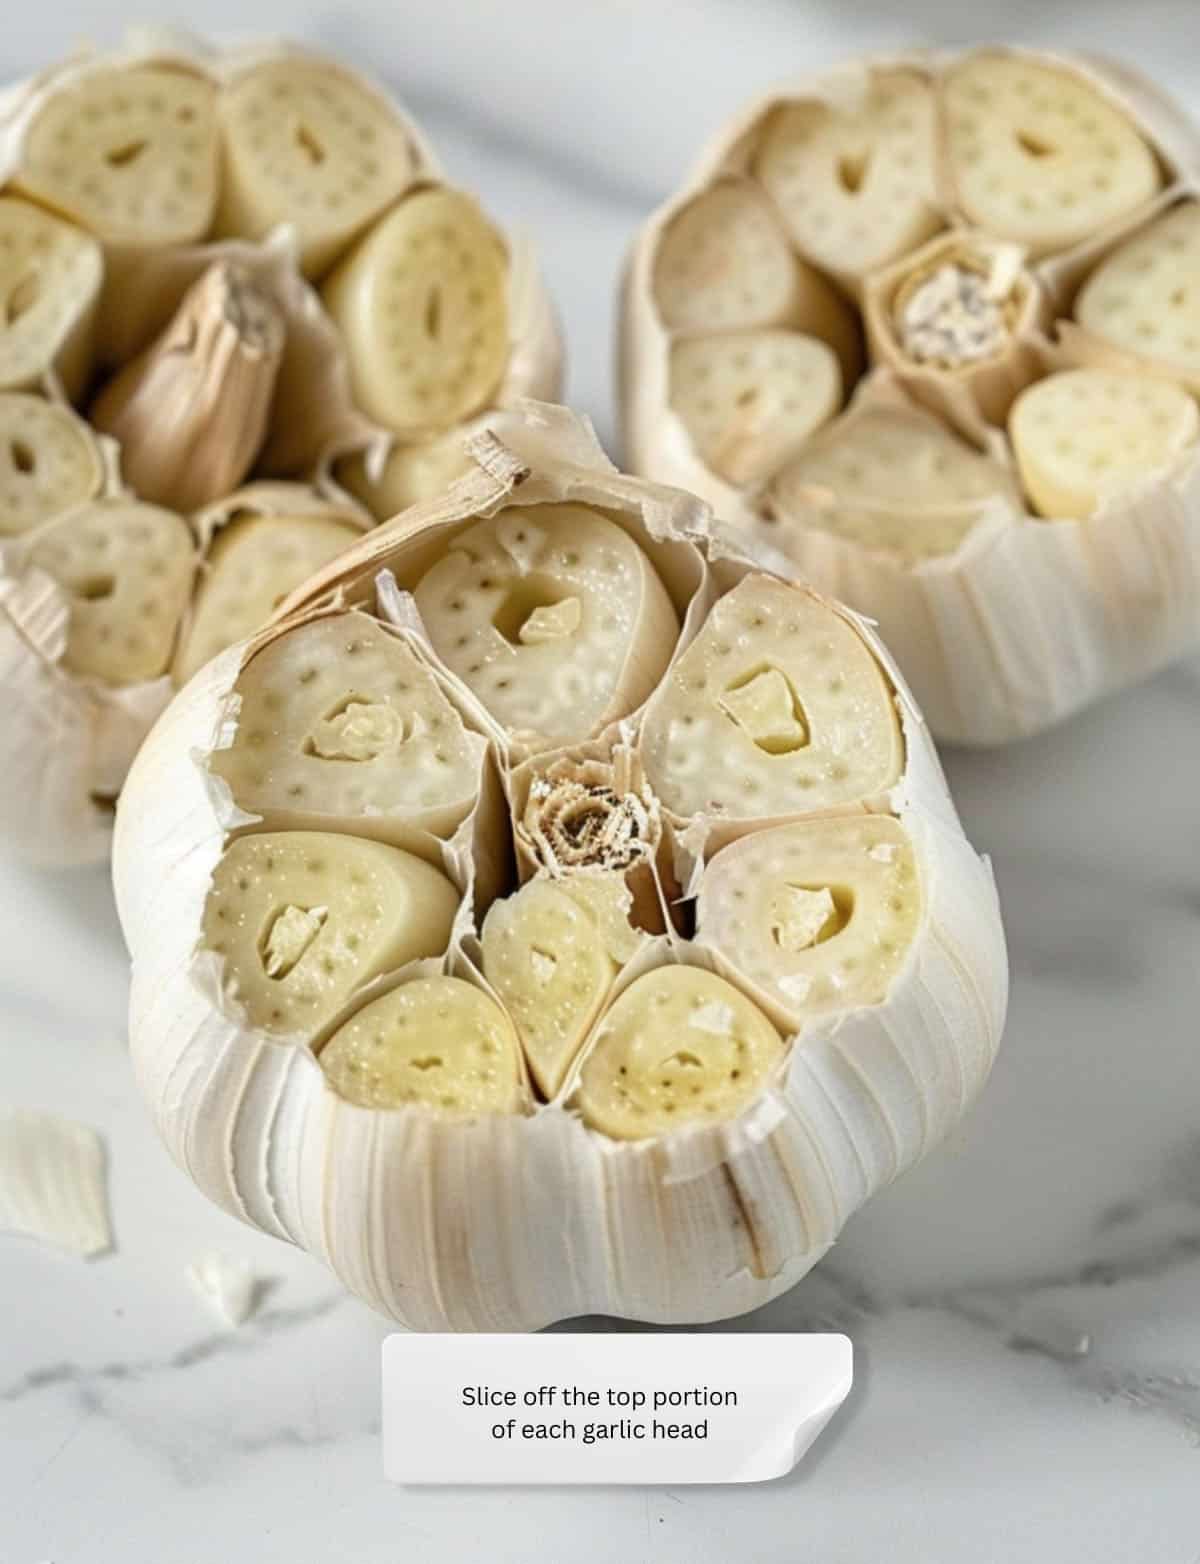
- Using a sharp knife, carefully slice off the top portion of each garlic head, about a ½ inch down. This exposes the individual cloves, allowing for even roasting.
- Place the garlic heads on a sheet of aluminum foil. Generously drizzle them with extra virgin olive oil, allowing it to seep into the exposed cloves. The oil adds richness and helps with the caramelization process.
- Finally, sprinkle a pinch of coarse sea salt over each head. This enhances the flavor and adds a little textural contrast.
Step 3 Wrap and Roast
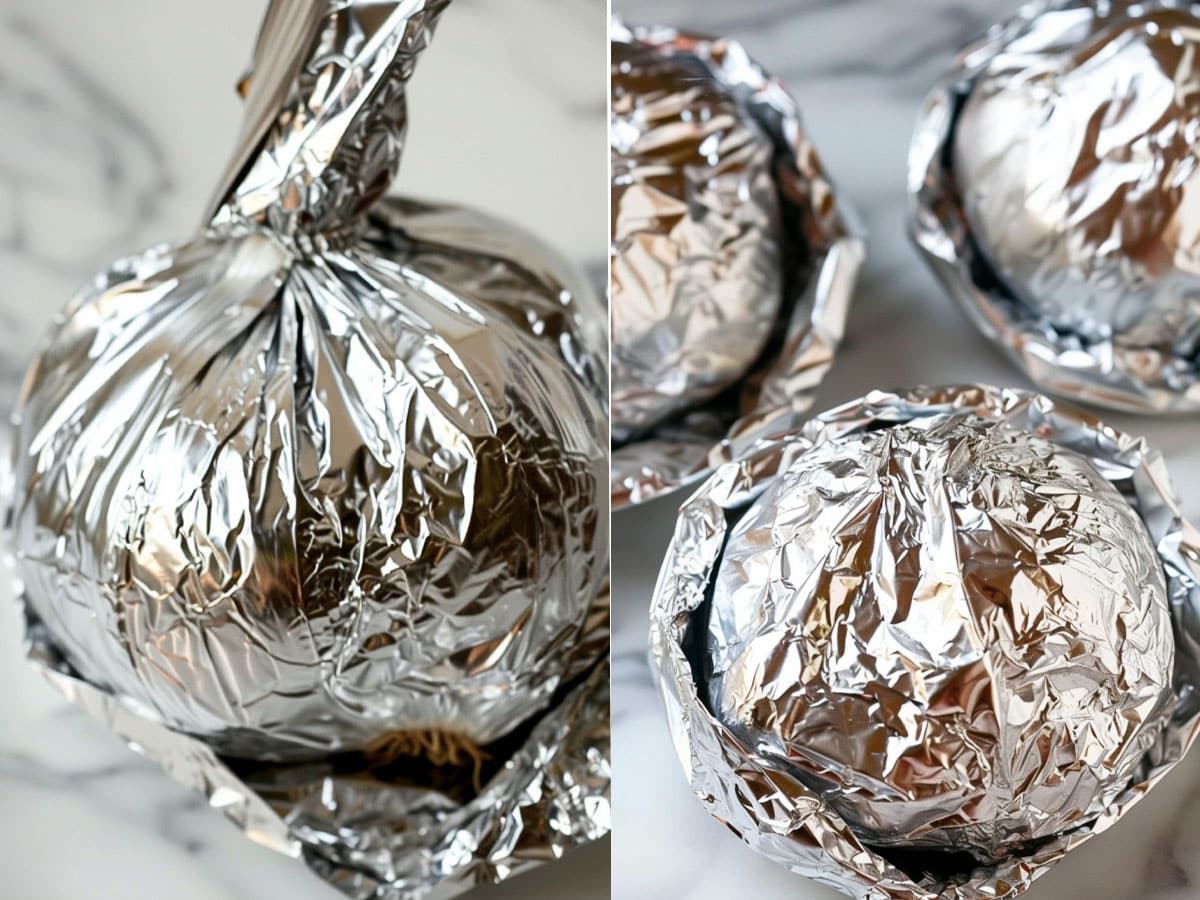
- Securely wrap the garlic in the aluminum foil, creating a snug, sealed packet. This traps the steam, essentially steaming the garlic within its own juices.
- Now, place the foil packet directly on the oven rack (no baking sheet needed!). This method ensures even heat distribution for perfectly roasted cloves all around.
- Roast for roughly 35-40 minutes. To check if it's done, gently pierce a clove with a fork. If it feels soft and yields easily, your garlic is ready!
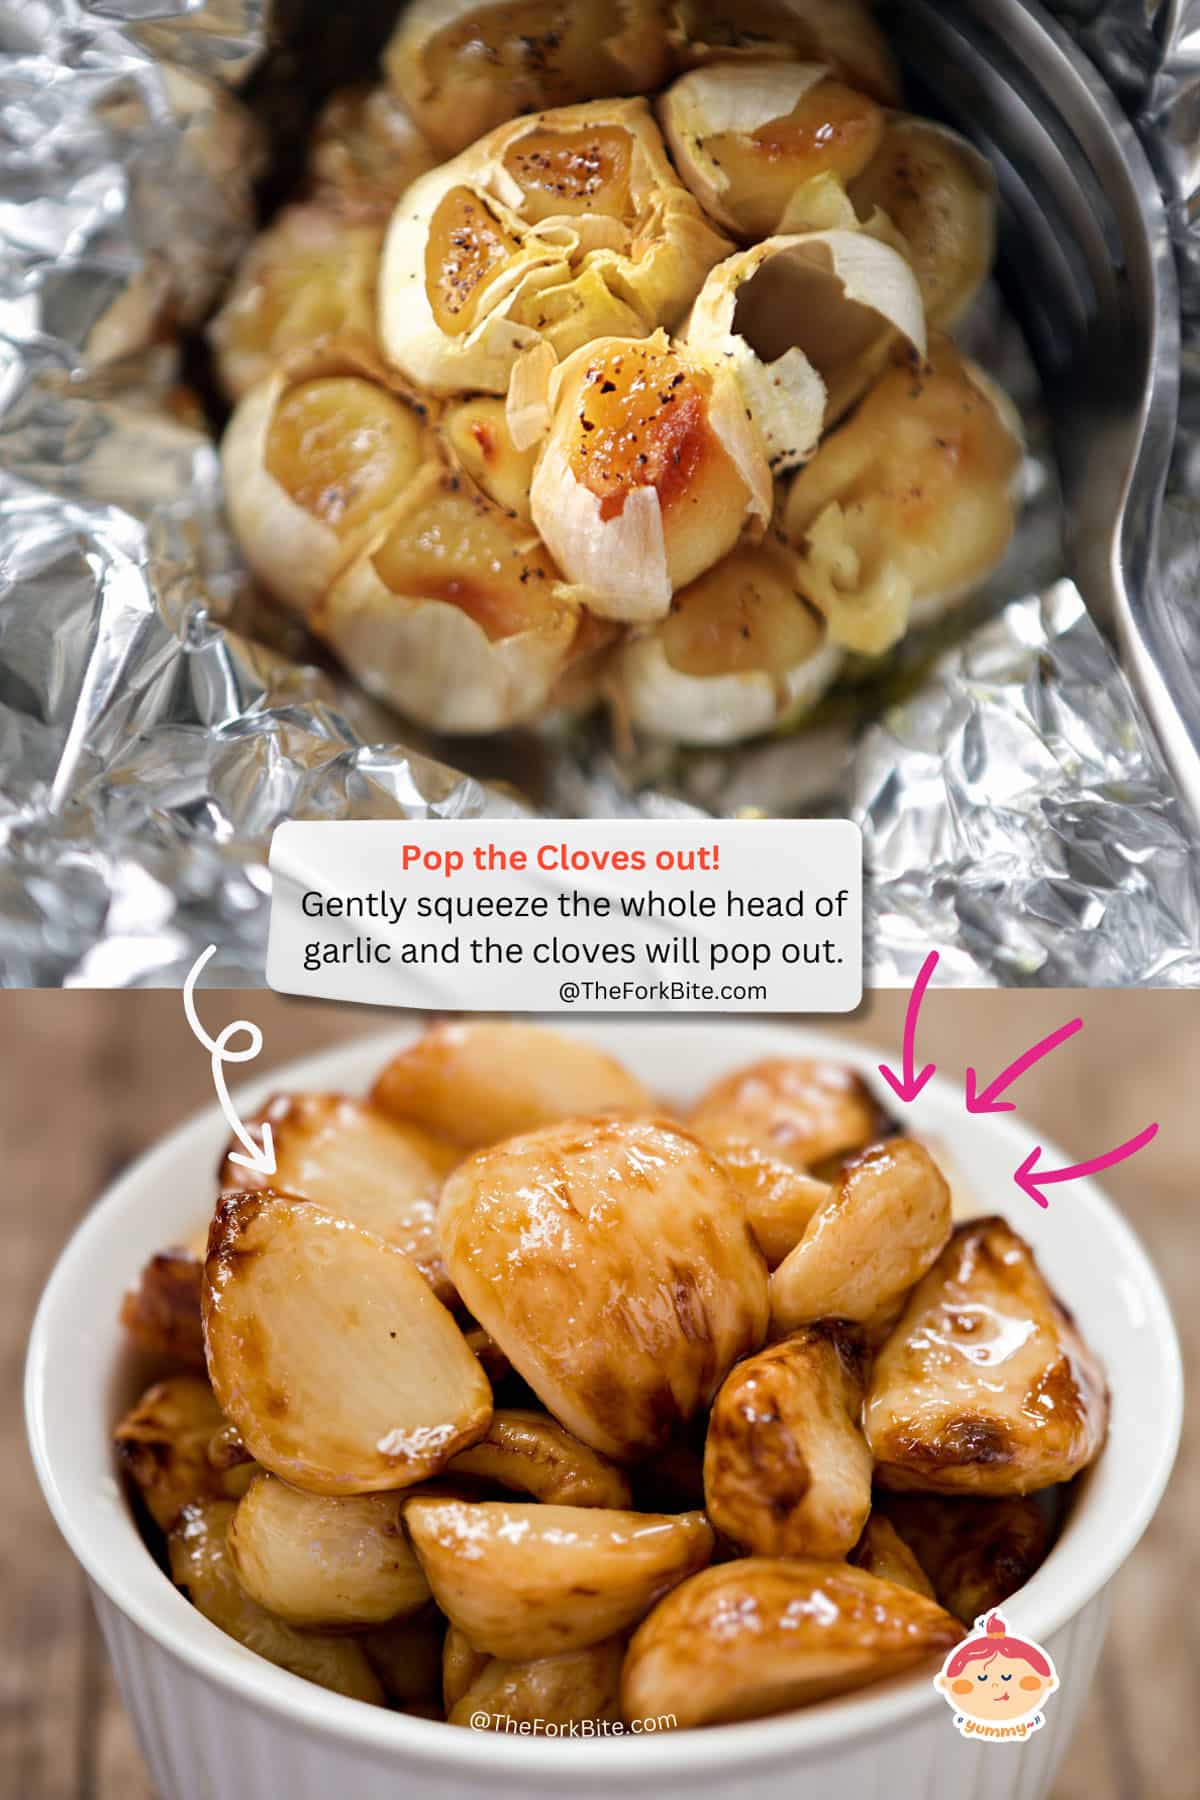
Step 4 Cool and Extract
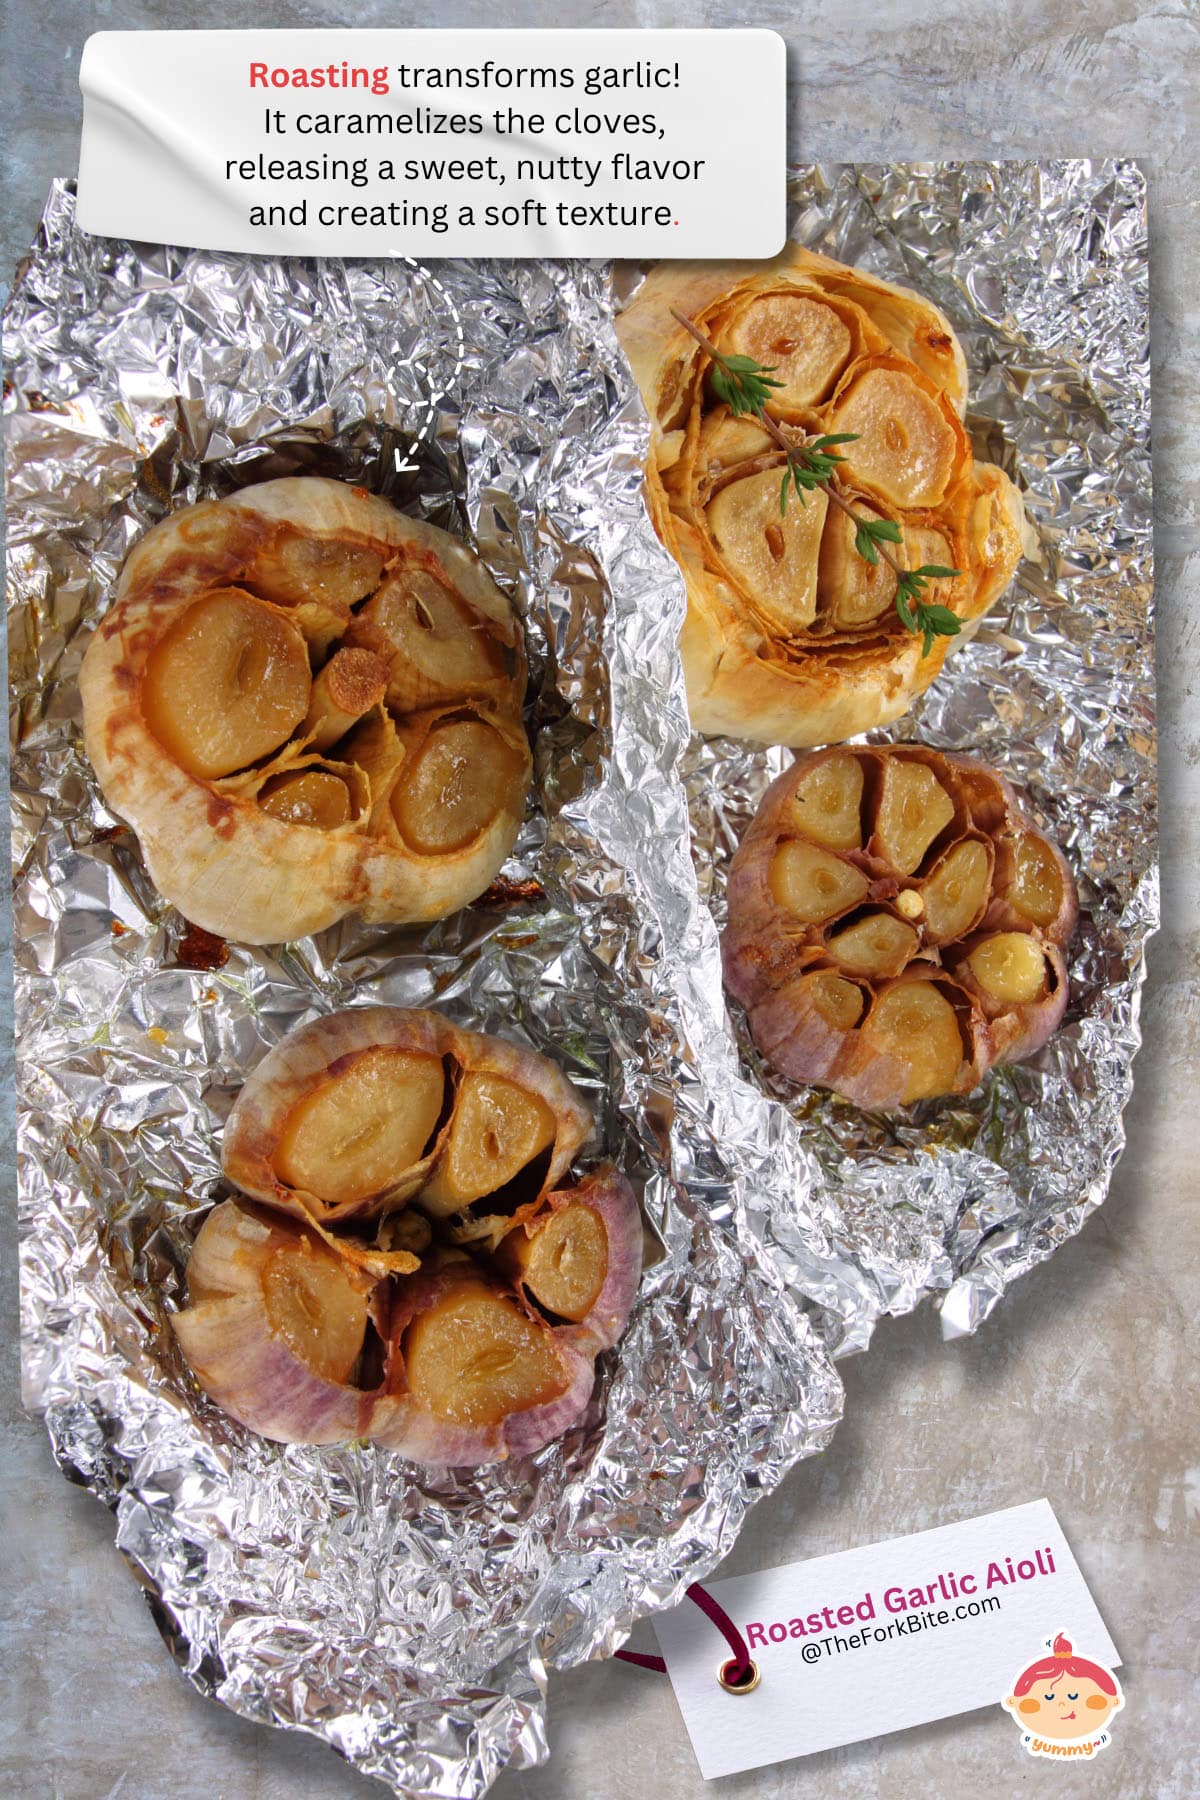
- Once roasted, carefully remove the foil packet and allow it to cool until it's comfortable to handle. Be mindful, as the cloves will be piping hot and incredibly tender.
- Now comes the satisfying part! Gently squeeze the base of each garlic head, and the roasted cloves should effortlessly pop right out of their skins. Grab a fork and mash those beauties up. Now you have perfectly roasted garlic, ready to transform your aioli!
Pro Tips:
- Garlic Variety: For milder flavor, use elephant garlic.
- Roasting Variation: For a hint of smokiness, try roasting your garlic on a stovetop grill pan over medium-low heat.
- Flavor Infusion: Slip a few sprigs of rosemary or thyme into the foil packet for an herb-infused flavor boost.
- Storage: Roasted garlic can be stored in an airtight container in the refrigerator for up to a week.
Tips:
- Adjust to Your Taste: Love it extra garlicky? Add more roasted garlic. Prefer a brighter flavor? Use additional lemon juice.
- Make It Fancy: Stir in a pinch of smoked paprika, a teaspoon of Dijon mustard, or some chopped fresh herbs (chives, parsley, or dill are great).
Ingredients You'll Need (for Classic Aioli)
Okay, I tried the classic aioli thing - pure olive oil, garlic, salt. Respect to the traditionalists, but it was way too intense for me. Don't get me wrong, I love a good garlic kick, but I'm all about finding ways to make things even tastier!
- Roasted Garlic - Obviously, it's the whole point!
- Oil - I like a neutral oil (like sunflower) so the garlic flavor really shines.
- Egg Yolk - This is the secret weapon for getting that creamy texture.
- Lemon Juice - Gotta have that tang to balance the richness.
- White Wine Vinegar - Adds a little extra zing! You can use more lemon if you don't have this.
- Dijon Mustard - Just a touch for some extra depth.
- Salt - Helps everything come together (and tames that roasted garlic sweetness).
The Secret to Aioli: It's All About the Emulsion
Okay, science time (but the easy kind!). Aioli is basically magic where you force oil and liquids to mix. Think about it - normally those guys hate each other! Here's the deal: you basically crush that garlic into a paste, then super slowly add the oil while whisking like crazy. That egg yolk helps too!
Step by Step Instructions (Classic Aioli)
- Whisk it Good:
- In a medium bowl, start by whisking together the egg yolk and lemon juice. The egg yolk is the key to creating the creamy base, and the lemon juice adds brightness and helps balance the richness.
- Slow and Steady:
- This is the most important part! Add the olive oil to the egg mixture incredibly slowly - starting with just a few drops at a time. Whisk constantly and vigorously.
- Why so slow? Oil and liquids don't naturally mix. By adding it gradually while whisking, you force tiny droplets of oil to bind with the egg, creating a stable, creamy sauce.
- Keep whisking until the mixture thickens noticeably.
- Garlic Time:
- Now that the base is set, stir in your mashed roasted garlic. That sweet, mellow garlic flavor will infuse the whole aioli.
- Season generously with salt and pepper. Salt enhances all the flavors, and lots of freshly ground black pepper adds a bit of a kick.
- Adjust:
- Taste and adjust! Prefer it thinner? Whisk in a bit more olive oil. Want more tang? Add a squeeze of lemon juice.
- If it breaks (separates), don't panic! Start with a fresh egg yolk in a new bowl, and very slowly whisk in the broken aioli until it emulsifies again.
Tips:
- Room Temperature: Ingredients at room temperature emulsify best.
- Patience is Key: Rushing the oil addition can cause the sauce to break.
Storing Roasted Garlic Aioli
- Maintaining Freshness:
- Airtight Container is Key: Always store roasted garlic aioli in a clean, airtight container. A glass jar with a tight-fitting lid is ideal.
- Refrigerate Immediately: Proper refrigeration is essential for food safety. Place your aioli in the refrigerator as soon as it cools.
- Shelf Life
- Homemade Aioli: Freshly made roasted garlic aioli, containing egg yolks, will generally last for 3-4 days in the refrigerator."
- Egg-free Variations: Aioli made without eggs can last slightly longer, around 5-7 days.
- Can You Freeze Roasted Garlic Aioli?
- The Nuances: While technically possible to freeze aioli, the texture and consistency often change upon thawing. Emulsions tend to separate.
- Better Alternatives: For the best quality, focus on making fresh batches of roasted garlic aioli as needed. However, you can freeze any leftover roasted garlic for future use.
What to Serve With Roasted Garlic Aioli
Okay, we admit it - this aioli is so tasty, you might just sneak a few spoonfuls. But here's the deal: it's even better when paired with delicious foods! Here are some ideas to get you started:
- Upgrade Your Meals: Drizzle it on baked salmon, slather it inside your ultimate chicken sandwich, or replace boring mayo with this garlicky goodness.
- The Classic: It's not just for fries (though they ARE a perfect match)! Embrace your inner foodie with the Grand Aioli, a French feast of veggies and that magical sauce.
- The Bottom Line: This aioli is your new secret weapon! It amps up anything it touches. The only limit is your imagination!
Classic Pairings (But Elevated)
- Fries Upgrade: Move beyond ketchup! Elevate fries with aioli - plain or seasoned with herbs, spices, or a touch of truffle oil.
- Seafood's Best Friend: The perfect complement to baked salmon, grilled shrimp, fish or beef tacos, or a classic crab cake.
- Roasted Vegetable Sidekick: Roasted broccoli, asparagus, or Brussels sprouts find their perfect match in aioli.
- Sandwich Spread: Aioli replaces boring mayo, giving burgers, chicken sandwiches, or BLTs a gourmet twist.
Beyond the Basics
- The Pizza Twist: Use aioli as a base for white pizzas, adding toppings like roasted vegetables, prosciutto, or fresh arugula.
- Pasta Sauce Upgrade: Whisk aioli into warm pasta for a quick and creamy sauce. Experiment with adding sauteed vegetables or seafood.
- Unexpected Salad Dressing: Thinned with a bit of lemon juice and whisked with herbs, aioli becomes a flavor-packed salad dressing.
- Dipping Delights: Use as a flavorful dip for crudités (raw vegetables), chicken wings, or even sweet potato fries.
Full Recipe

Ingredients:
- 3 bulbs garlic (roasted)
- 1½ cup Mayonnaise
- 1 tablespoon olive oil
- 1 tablespoon lemon juice
- 1 tsp Worcestershire sauce
Instructions:
- Combine and Mix. In a medium bowl, combine the mashed roasted garlic, mayonnaise, and lemon juice. Start with 1 tablespoon of lemon juice, then taste and adjust.

- Slow and Steady. Whisk in the olive oil gradually, starting with a teaspoon at a time. This allows it to emulsify smoothly, creating a luxurious, creamy texture.Taste as You Go: Keep tasting your aioli as you add oil until it reaches your desired richness. Olive oil adds a lovely fruitiness and smoothness to your aioli. Choose a good quality one for the best results.
- Worcestershire Adds Complexity. Right after incorporating the olive oil, whisk in a few drops (roughly ½ teaspoon) of Worcestershire sauce. This provides a hint of savory depth and a subtle tang ('umami'). You can add a little more if you like a stronger flavor.
- Season to Perfection.Add salt and pepper to taste. Start with a small amount and adjust until the aioli reaches your desired flavor.
- Chill and Enjoy. Cover and refrigerate your Roasted Garlic Aioli for at least 30 minutes to allow the flavors to meld. This also helps thicken it slightly. Then, dig in!

Notes:
Storing roasted garlic aioli
- Maintaining Freshness:
- Airtight Container is Key: Always store roasted garlic aioli in a clean, airtight container. A glass jar with a tight-fitting lid is ideal.
- Refrigerate Immediately: Proper refrigeration is essential for food safety. Place your aioli in the refrigerator as soon as it cools.
- Shelf Life
- Homemade Aioli: Freshly made roasted garlic aioli, containing egg yolks, will generally last for 3-4 days in the refrigerator."
- Egg-free Variations: Aioli made without eggs can last slightly longer, around 5-7 days.
- Can You Freeze Roasted Garlic Aioli?
- The Nuances: While technically possible to freeze aioli, the texture and consistency often change upon thawing. Emulsions tend to separate.
- Better Alternatives: For the best quality, focus on making fresh batches of roasted garlic aioli as needed. However, you can freeze any leftover roasted garlic for future use.
Nutrition Information:
Please note that all nutrition information are just estimates. Values will vary among brands, so we encourage you to calculate these on your own for most accurate results.